Azure Update Manager - Manual Operations Guide
Infrastructure as Code
Azure Update Manager has been deployed using IaC which is described in the Azure Update Manager - Operations Guide. Link
This manual operations guide, is for testing, one off problems and troubleshooting only.
Azure Portal - On demand operations
These processes can be used to trigger scans and deploy updates on demand. A single VM can be managed from its Azure portal webpage by browsing for the VM and select the Update from the left hand menu. Multiple VMs can be managed from the Azure update manager web page.
Link to AUM in Azure portal, be sure to connect to the correct platform Azure Update Manager Portal
Individual VM Updates
Link to Process for multiple VMs
Step 1 - Enable AUM
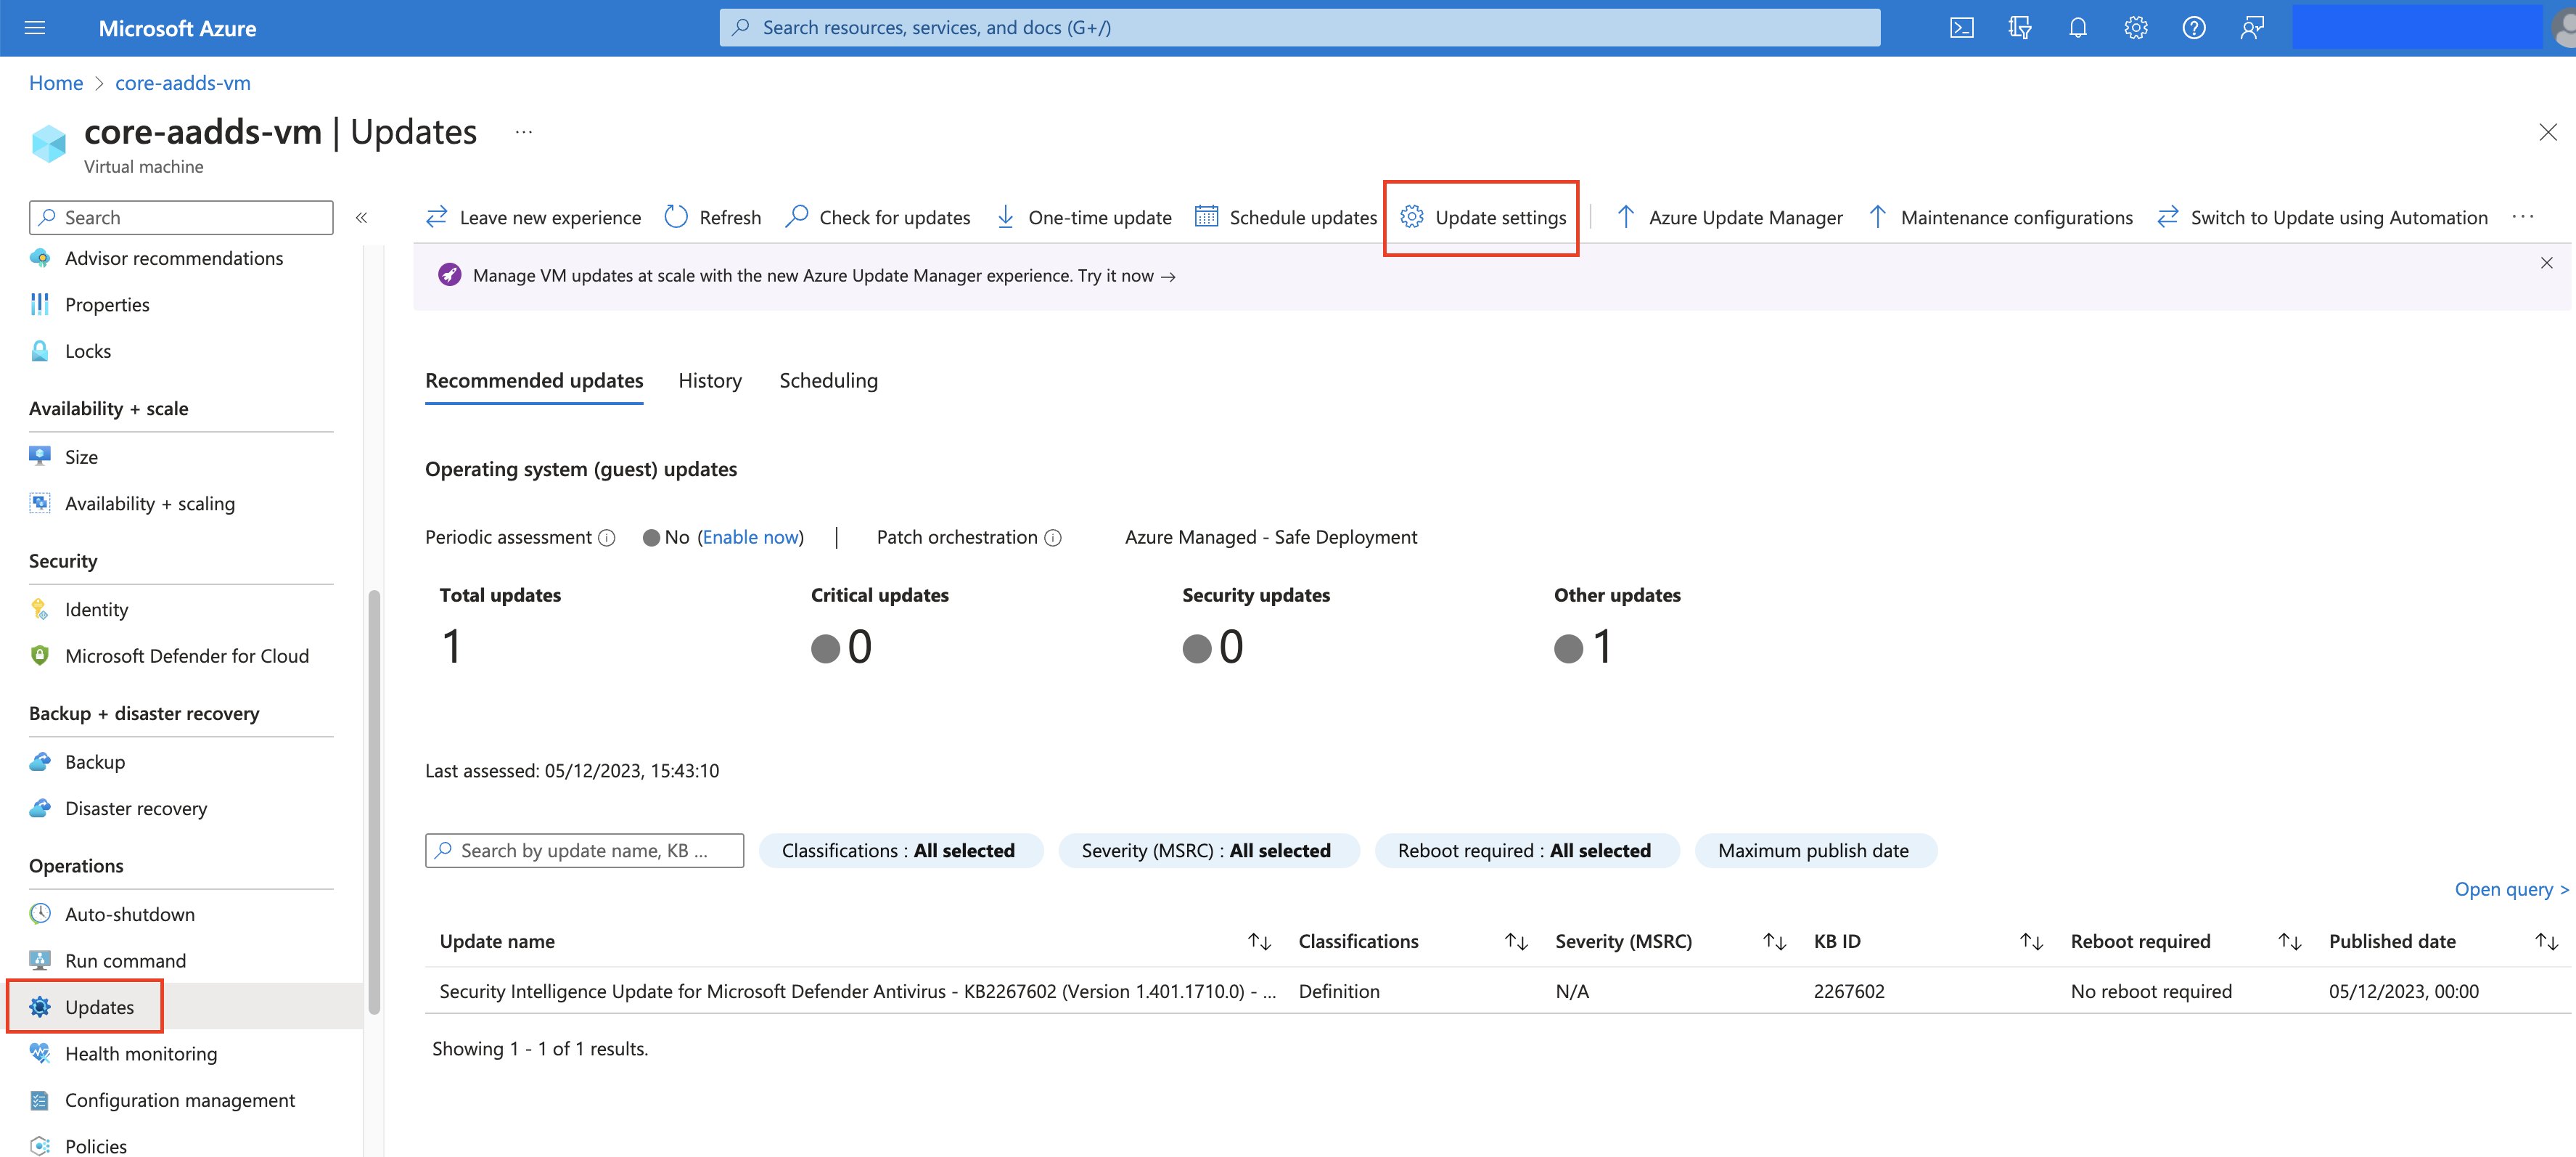
- Using the Azure portal, browse to the VM to be protected. Select Operations / Updates from the tool bar, then Update Settings
- For HMCTS maintenance configurations, set the Periodic assessment as Enable and Patch orchestration as Customer Managed Schedules
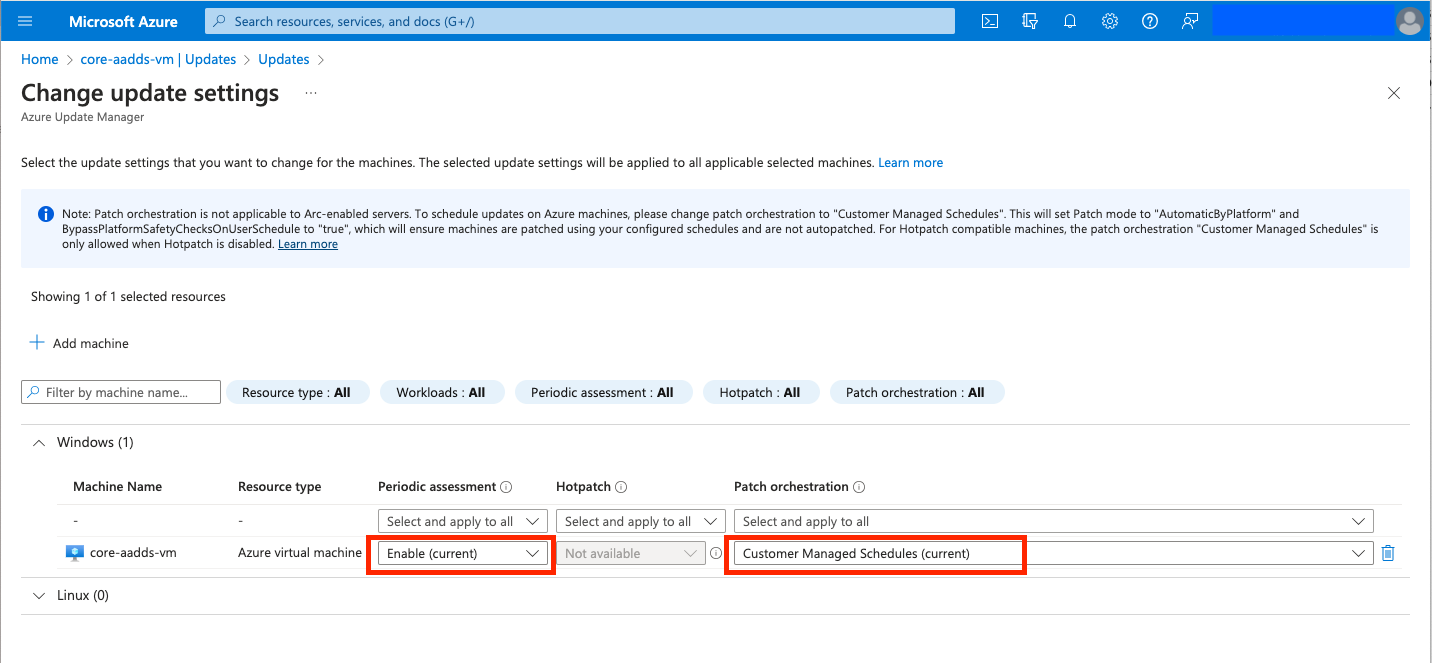
Various problems described in the troubleshooting section are the result of not setting these values correctly.
Step 2 - Trigger OS Assessment
AUM will ask the OS to begin an audit of missing updates using its own tool, either Windows Update or APT/YUM. Please note this process can be slow, as it needs to trigger the OS tool, wait for the results, collect the results and then process them with the AUM. Waiting patiently is recommended and triggering more than 3 scans in a 24 hour period can result in even longer waits.
- Using the Azure portal, browse to the VM to be protected. Select Updates then Check for Updates. Can take 5 minutes for Linux machines and 20 - 40 minutes for Windows VMs.
The results will be shown on the VMs Updates page as Recommended Updates. If nothing is shown as required, there is nothing to update and the process is complete.
Step 3 - Updating VM/s
Once a scan has successfully completed, AUM will present a list of missing updates which can be applied to the VMs operating system.
- Select One-time update from the VMs Updates screen, to open the Install one-time updates wizard. Select the Machine Name to be updated and click Next.
Caution - Update Selection
By default ALL Update classifications are selected, which includes updates to applications and OS version!!! Be sure to select ONLY Critical updates, Security Updates and Definition Updates for Windows OS or Security and critical updates for Linux OS.
- A preview of the updates to be installed will be displayed. This can be modified using the Update selection options. Once the correct updates are displayed, click Next.
Caution - Reboot Selection
The default reboot option is “Reboot if required” which can sometimes automatically reboot the VM to complete the patching process. Be sure to select the “Never reboot” option, if you don’t want the VM to reboot. Click Next
- Review the choices which have been selected and click Install to start the update job. To abort the wizard, click the X in the top right hand corner, ending the process.
The patching process will begin.
Step 4 - Rebooting VM
- If you need to manually reboot the VM, select Overview from the left hand menu. Then click on the Restart button, which will gracefully restart the operating system.
Step 5 - Progress and History
- From the VMs Updates page, select the History button. Each jobs status will be displayed including active tasks. However this information can lag many minutes behind. Waiting patiently is recommended…
Ad Hoc Jobs For Multiple VMs
To manage multiple VMs, browse to the Azure Update Manager, Machines page
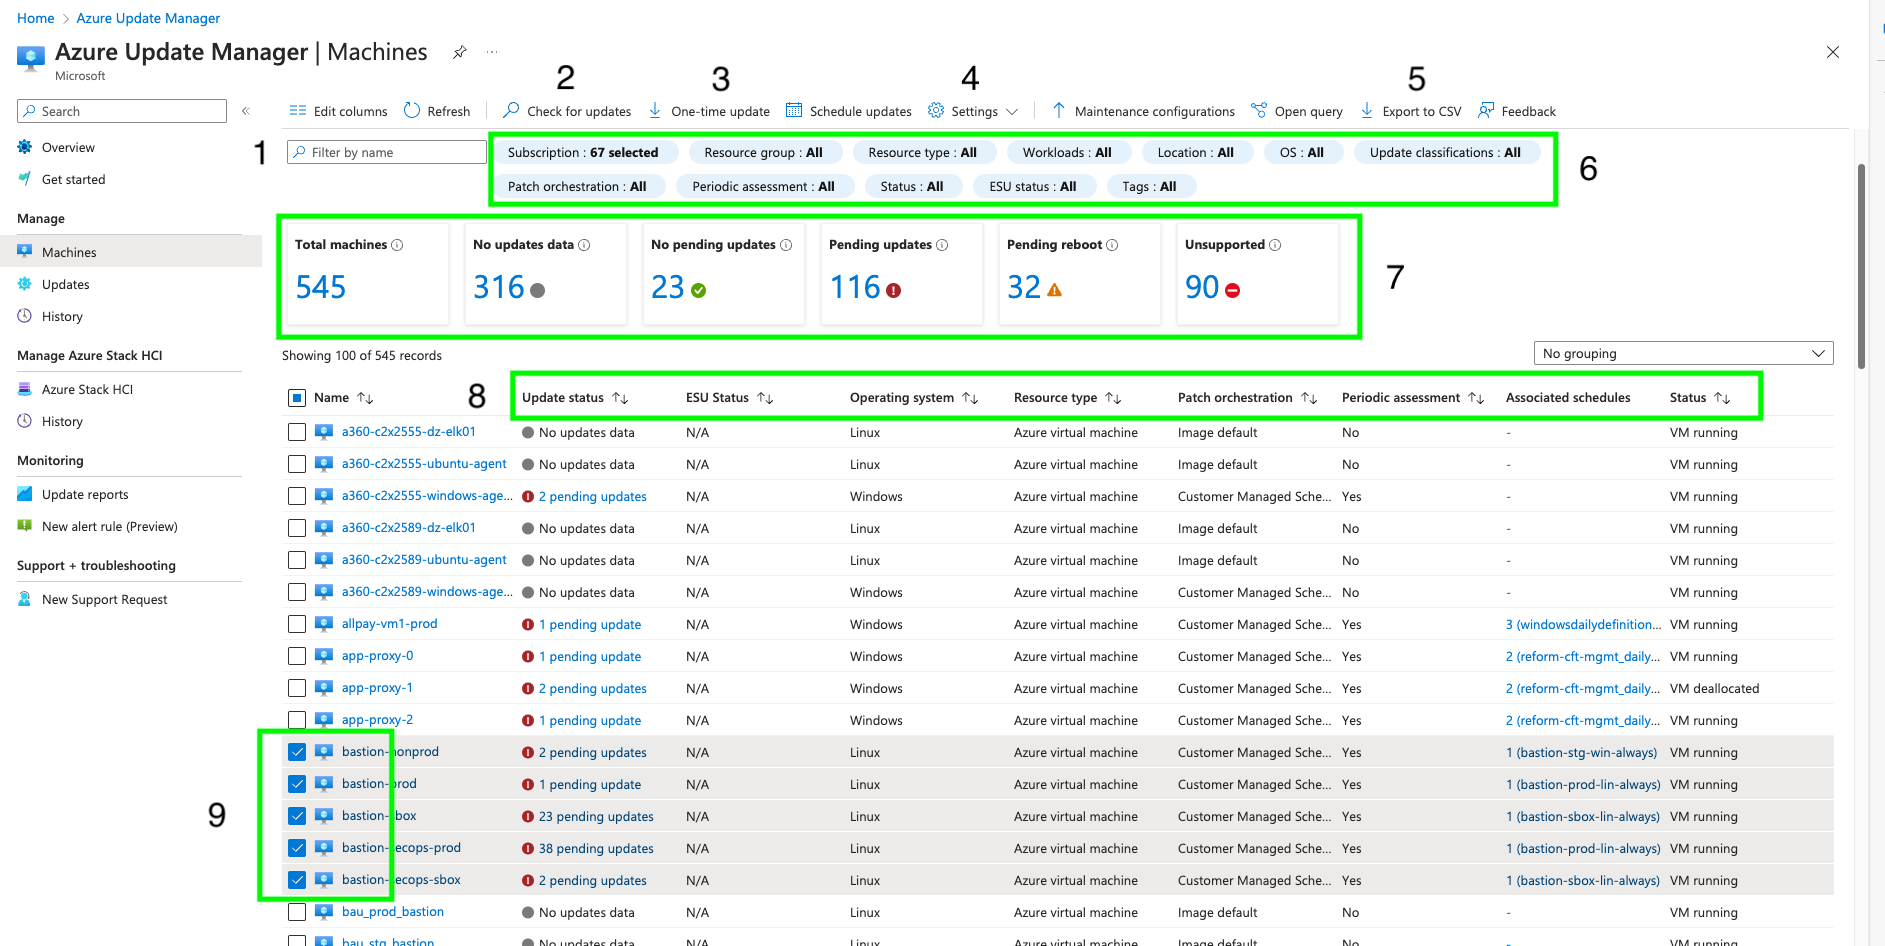
Filter by Name
- Filter by name (1 on diagram) enables searching for VMs by using either the specific name or just part of the name, such as proxy. In the diagram, ‘proxy’ would return change the view, to show just the 3 machines app-proxy-0, app-proxy-1 and app-proxy-3. Using ‘sbox’ would return ‘all’ 21 from 545 VMs, with sbox, within any part of their name.
Check for Updates
- By first selecting the target VMs using the check box (9 on diagram), a scan for missing updates can be triggered by clicking Check for Updates. (2 on diagram).
One-time update
Caution - Update Selection
By default ALL Update classifications are selected, which includes updates to applications and OS version!!! Be sure to select ONLY Critical updates, Security Updates and Definition Updates for Windows OS or Security and critical updates for Linux OS.
- After selecting the target VMs, click One-time update (3 on diagram) to open the wizard. Select all the VMs to be updated and click Next. A preview of the updates to be installed will be displayed. This can be modified using the Update selection options. Once the correct updates are displayed, click Next.
Edit Update Setting
- Azure policy should force the VMs update settings but sometimes they need to be changed. Select the target VMs and the click Settings (4 on diagram).
Export to CSV
- Azure Update manager holds data about the VMs which can be exported to a CSV file and processed by 3rd party applications like Excel. Use Export to CSV (5 on diagram).
Filters
- With over 500 VMs, the machines view can contain a lot of noise. The diagram shows app-proxy-1, which is deallocated. By click on Status within the view filers (6 on diagram), only running VMs could be shown. These filters are very powerful and time spent exploring them, with be rewarded.
Fast Filters
- The view of shown VMs can be quickly changed using these filters. Just click on Pending reboot (7 on diagram), to see only these 32 VMs.
Column Order
- By default, the view of VMs is sorted by the VMs name. This can be changed by selecting any column header (8 on diagram).
Link to AUM in Azure portal, be sure to connect to the correct platform Azure Update Manager Portal