Barracuda Web Application Firewall Deployments
This page provides information on the deployment and configuration of the Barracuda Web Application Firewall (WAF). The WAF is deployed using the cpp-terraform-azurerm-waf repository.
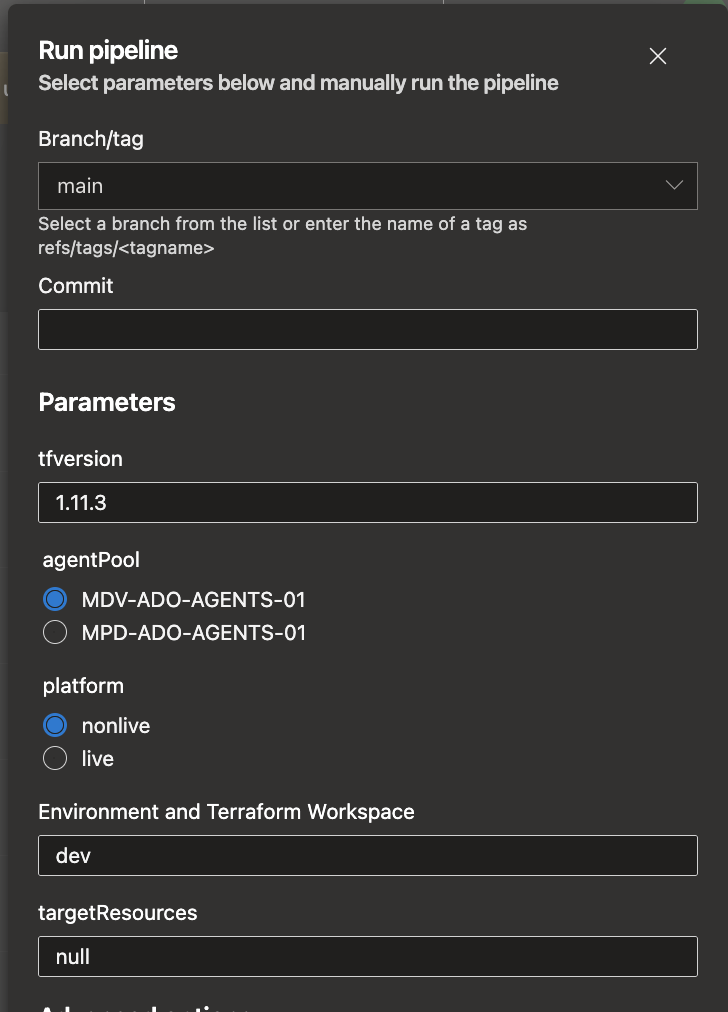
Deployments are managed via Terraform, with environment-specific configuration supplied through .tfvars files containing the required values. The deployment pipeline can be found here (ensure you set the environment name to match your .tfvars file when running the pipeline). The destroy pipeline is available here.
Connecting to the WAF
To connect to the WAF, you must be on the Crime VPN. The following example shows how to connect to the nonlive WAF.
First, get the IP address of the WAF. Then use the command below to create an SSH tunnel, forwarding port 8000 on the WAF to port 8020 on your local machine (you can choose a different local port if you prefer):
ssh -L 8020:10.89.192.16:8000 DEVJUMPL01.cpp.nonlive
Once the tunnel is established, you can access the WAF by navigating to http://localhost:8020 in your web browser.
Setting up the WAF
If you want to connect to the old WAF, you can find the password in HashiCorp Vault at the path secret/terraform/dev/waf_admin_password. The username will be admin.To set up the WAF, follow these steps:
Get a backup of the current configuration by exporting it from the old WAF. If it is a newer firmware version, you can export the JSON configuration. If it is an older version, you will need to do a manual backup. For manual backup instructions, see Barracuda WAF - Configuration options.
Once you have the backup, import it into the new WAF. This will ensure that all your existing rules and settings are preserved. If your new WAF supports importing the JSON configuration, you can export the JSON configuration and save it in the cpp-terraform-azurerm-waf repository. For importing, a full manual export and import process is recommended as mentioned here: Export & Import.
After importing from backup, export the JSON configuration from the new WAF and save it in the cpp-terraform-azurerm-waf repository. This will serve as a reference for future deployments and ensure that you have a backup of the current configuration.
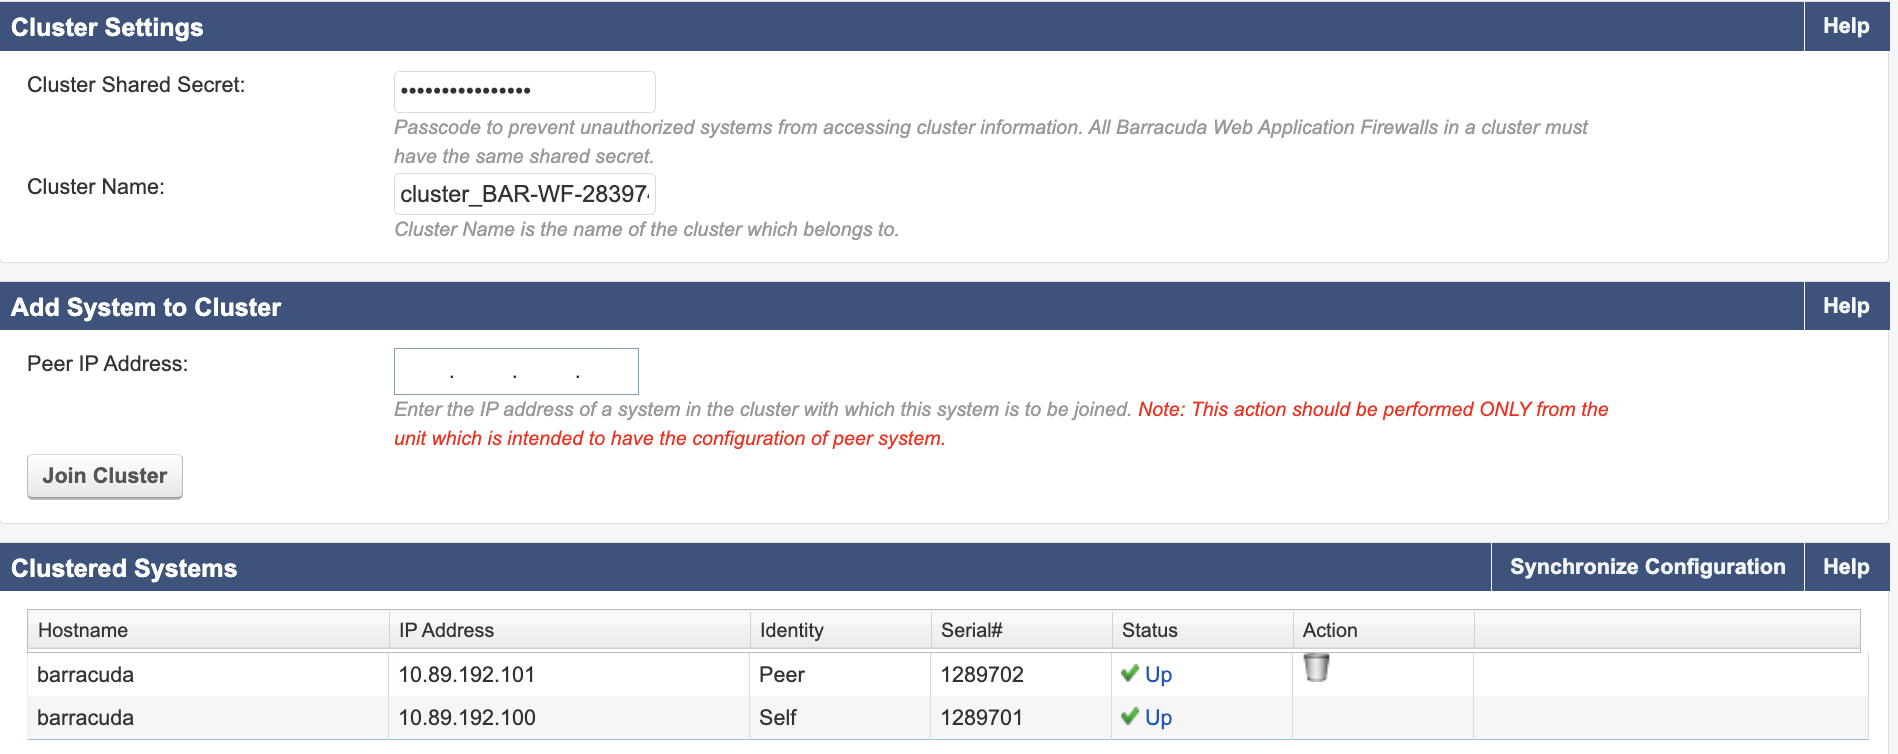
Finally, set up High Availability (HA) for the WAF under the Advanced tab. This involves configuring the WAF to work in a pair, ensuring that if one WAF fails, the other can take over without service interruption. Use the vault secret found in HashiCorp Vault at the path secret/terraform/dev as the vault secret, then add the IP address of the other WAF in the peer WAF to join the HA pair together as shown below.
Initial Configuration and Licensing
When you open the UI for the first time after deploying the VMs, it will ask you for the token. You can use the existing licence token from the Barracuda WAF Discovery - Licence information page or get a trial licence token (ask Babu for trial licence tokens).
Important: Make sure the backup is restored on both of the VMs and then paired; otherwise one is going to overwrite the other one.
Basic Configuration Steps
Set Time Zone: Navigate to Basic → Administration → Time Zone and set it to GMT.
Configure High Availability Pair:
- Go to Advanced → High Availability
- Copy the secret using the command:
sh vault read secret/terraform/prd/waf_cluster_secret - Add the secret and keep the cluster name as it is
- Save the configuration (this may restart the WAF)
- In the peer IP address field, add the primary IP of the second VM (you will need to type it in manually as pasting is not supported)
Verify WAF Configuration
After completing the initial setup, confirm the following details on the WAF UI:
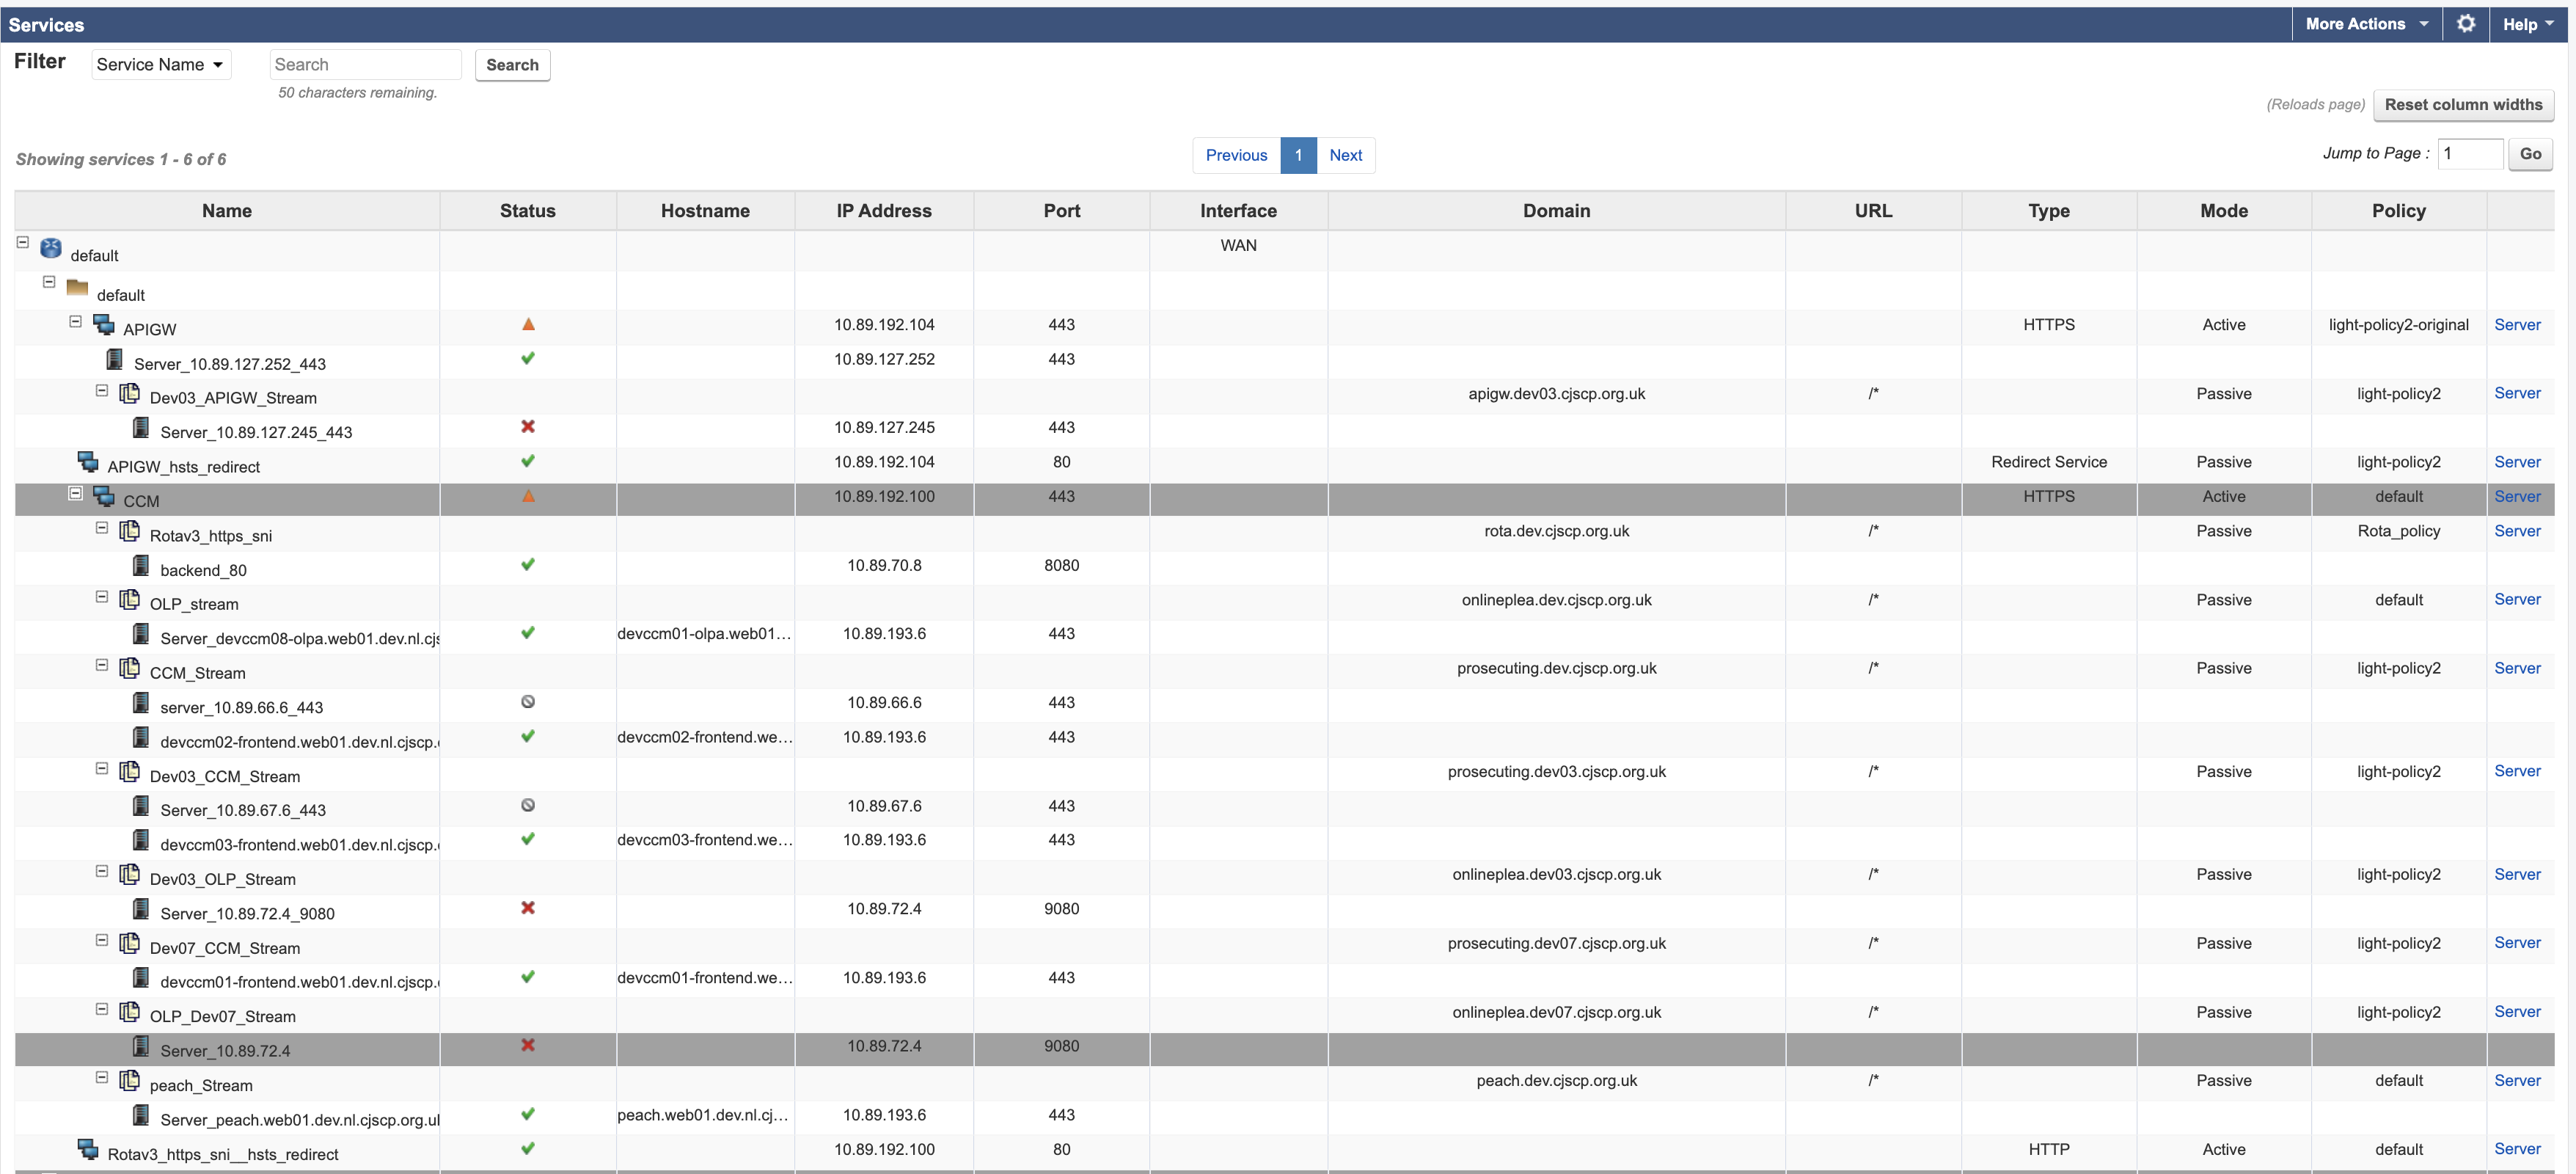
Basic → Services: Verify that all services are showing green status. If any service is not green, troubleshoot to identify the issue.
For example, in the PRD environment, some services’ status was not green after initial deployment, mainly because the new subnet range was not allowed on the NSG of the particular service. The ROTA service (10.202.70.7) attached to the LoadBalancer required whitelisting on the NSG group NS-PRD-ROT-WEB-01. See this PR for reference.
Stream IP Configuration: Ensure that all streams have their own IP address assigned.
For example, in the PRD environment, the CCM stream automatically selected the IP of the WAF machine, but for the APIGW stream, we had to manually change it (by editing the entry on the WAF UI) to the secondary IP of the NIC.
Security Policy → Policy Manager: Verify that the policies match the expected configuration.
Website → Website Translations: Ensure all website translations match the expected configuration.
Update Azure Configuration
Navigate to Basic → Azure Configuration and copy the following from the existing WAF to the new WAF: - Authentication Key - Application ID - Tenant ID
After entering these details, click “Test Configuration” to verify the Azure integration is working correctly.
Testing and Switch Over to the New WAF
Deploy load balancers to route traffic to the new WAF. The load balancers should be configured to point to the new WAF IP addresses. You can find the IP addresses in the terraform.tfvars file for your environment.
- You will need to test all the streaming services and website translations to ensure that they are working as expected with the new WAF. (It is best to compare with the old one.)
Each stream is a separate service, so you will need to test each one.
![]()
To test the stream services, update the IP address of the main service host in the backend pool of the load balancer. The best way to find out which load balancer to update is to query the domain name of the service; this will point you to the correct load balancer. The IP address it resolves to is the load balancer frontend IP address.
Testing Stream Services
There are three main stream services that need to be tested:
APIGW
To test this service after you have updated the IP address, you will need to get a test certificate as it is required for testing the connectivity of APIM.
To get the test certificate, you can ask AJ to generate one, then run the following command to test the connectivity:
curl https://apigw.dev03.cjscp.org.uk/echo/resource --cert test_cert.cpp.nonlive.pem --key test_cert.cpp.nonlive.pem
After running the command, you will receive an empty reply, which means the connectivity is working.
CCM
This service can be tested by updating the IP address of the host in the backend pool of the load balancer to point to the new WAF IP address and updating the load balancer admin state to “up”. You can then access the service through the domain name.
IDAM
Update the NSG of the APIM web app to allow the new WAF subnet to access the IDAM service. See this PR for reference: whitelist waf subnet for DEV
If you do not know which load balancer to update, you can search for the IP address in the Azure portal, and it will show which load balancer it is attached to.
Once you have found the load balancer, check the frontend configuration to see which frontend IP address the domain resolves to. For example, the frontend IP address for onlineplea.dev.cjscp.org.uk is 51.11.44.0, which resolves to WAF-FRONTEND-01. It will use the backend pool of WAF-FRONTEND-01 to route the traffic to the new WAF IP address.
Switching Over to the New WAF
To transition traffic to the new WAF, update the backend pool of the relevant load balancer to use the new WAF IP address. Change the admin state of the new WAF host to “up” and set the old WAF host to “down.” This routes traffic to the new WAF while keeping the old WAF available for fallback. Before making the switch, ensure the new WAF is fully tested and announce the change in the cpp-devops Slack channel. If needed, you can roll back by reverting the admin state.

Test each service by accessing its domain name to confirm traffic is routed through the new WAF.
Before switching the admin state, ensure that the new WAF is fully operational and has been tested with the services, and announce it in the cpp-devops Slack channel. If there is any issue, you can roll back if needed by switching the admin state.
Test the service by accessing it through the domain name of the service. For example, you can access the onlineplea.dev.cjscp.org.uk service by navigating to https://onlineplea.dev.cjscp.org.uk/ in your web browser.