XDR Agent installation
We have developed a proof of concept to deploy the XDR agent on Windows and Linux VMs, as specified in Jira tickets DTSPO-17780 , DTSPO-17781.
Our goal was to determine how to programmatically retrieve and install the agent on Windows and Linux VMs. This would ensure a straightforward and automated process for deploying these components across multiple VMs in the HMCTS tenant.
This document provides a detailed outline of the procedure, offering guidance for anyone tasked with rolling out the agent installation on various VMs.
Prerequisites
The XDR agents aren’t publicly available to download and install, it will need to be downloaded from XSIAM console. We in HMCTS do not have access to the console hence we need liaise with MOJ Secops engineers.
This are the few Engineers whom we messaged on MS Teams to get hold of installers. Nabil Ahmed = Delivery Manager, Touhidul Islam = Engineer, Zubair Mohammed = Engineer, Vinnie Burtonshaw = Engineer
There is also new MS Team channel called "HMCTS - Tagging Catch Up" where can ask MOJ engineers questions related to XDR Agents.
We got all the information we needed from Touhidul Islam.
MoJ SecOps provided an agent installer package that is preconfigured with the different log sources for both Windows and Linux. We currently do not need to pass any config options to the installation.
We then uploaded the agent for different OS versions on the cftptlintsvc storage account under xdr-collectors blob. We have to download the blob storage on the VMs where we going to install agent and collector using Storage Account Key.
Make sure the Service connection/Service Principal you are using on the pipeline which deploys the extension, has “Contributor” access to the storage account to access the Storage account access keys.
az role assignment create --assignee <ClientAppID> --role Contributor --scope "/subscriptions/1baf5470-1c3e-40d3-a6f7-74bfbce4b348/resourceGroups/core-infra-intsvc-rg/providers/Microsoft.Storage/storageAccounts/cftptlintsvc"
Windows
We have installed the agent on various windows VM to prepare this POC, that includes NEXT-CGI-M-VM-W, martha-vm1-stg and martha-vm1-stg.
We have confirmed installation of agent is done though using RunCommand Extension for Windows.
There are two ways to install this tools using runcommand extension
1. Using terraform-module-vm-bootstrap module (Preferred)
If the repo you are working on already using above module, its best fit to install the agent using the runcommand extension. This below is the example PR which need to raise in order to install.
2. Use RunCommandExtension directly on the Repo (Not Preferred) If the repo is already using the runcommand extension, you would not able to use above module’s runcommand extension as it will conflict and you can only have one extension at time. Hence you would have to copy across the scripts from here (PowerShell Script) to the repo and then implement runcommand extension accordingly.
Verify Installation
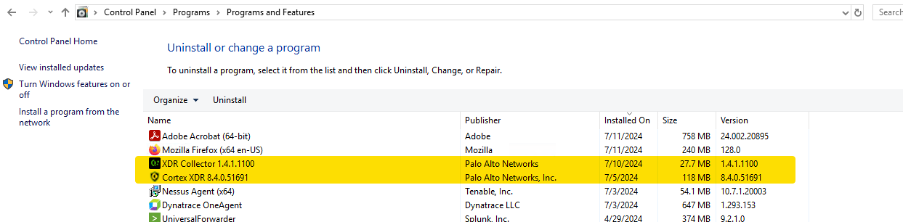
Once you managed to install agent, login to the VM in question and open “Program and Features” to verify the installation of the tools are successful.
Below are the tools you are looking for..
Also, speak to MOJ Engineers (listed in the Pre-Requisites above) to confirm that the VM is reporting to XSIAM console correctly. May be if you are working on list of VMs, only send them a smaller amount of list at the end of the task.
Troubleshooting
1. Please note that while working on this, we found that there may be staled runcommand extension on the VM which we may not able to see from the Azure portal but its showing when we go to C:\Packages\Plugins\Microsoft.CPlat.Core.RunCommandWindows\1.1.18 folder. You will get error message on the terraform that runcommand is conflicting with existing runcommand.
In order to fix this, you will have to run AZ cli command from your local to remove the extension.
Make sure you are on the correct subscription, then run this, it will take few minutes to finish running this command.
az vm run-command invoke --command-id RemoveRunCommandWindowsExtension --name <VM-NAME> -g <VM-RESOURCE-GROUP>
2. If the tools are not installed for any reason, we have to troubleshoot to find out why. Login to the VM and the browse to the C:\Packages\Plugins folder. You shall see run_command_logs.txt file. This should indicate at what stage Script has managed to run and then you should be able to match it with PowerShell Script to find any problem.
Also, the actual downloaded script should be located in the C:\Packages\Plugins\Microsoft.CPlat.Core.RunCommandWindows\1.1.18\Downloads folder, you should also able to re-run this script on VM as admin user to find problems.
Uninstall
In order to uninstall XDR agent from Windows, we have to first disable the Cortex XDR agent security protection. This can be done using cytool command line which got installed part of the cortex installation.
Please open Command prompt as Administrator and CD to this location, C:\Program Files\Palo Alto Networks\Traps. Then you can run this command cytool protect disable
Please note that running above command will ask for Supervisor password, majority of our VMs are attached to production XSIAM console so you will need below production password from the KeyVault. If the password does not work, we have to ask updated password to MOJ Engineers.
NonProd XSIAM Console Password
After successfully disabling security protection, simply open Control Panel -> Program and Features -> Uninstall Program and then uninstall Cortex Agent
This will automatically remove the VM from the XSIAM Cortex portal
Linux
Almost like Windows installation above, we have done this POC on the basis of installation on couple of Heritage Redhat Linux VMs (NPCOL-WEB-VM01, NPCOL-WEB-VM02) and then deployed separate Ubuntu VM to implement the installation.
There are two ways to install this tools using runcommand extension
1. Using terraform-module-vm-bootstrap module module (Preferred)
If the repo you are working on already using above module, its best fit to install the agent using the runcommand extension. This below is the example PR which need to raise in order to install.
2. Use RunCommandExtension directly on the Repo (Not Preferred)
If the repo is already using the runcommand extension, you would not able to use above module runcommand extension as it will conflict and you can only have one extension at time. Hence you would have to copy across the scripts from here (Bash Script) to the repo and then implement runcommand extension accordingly.
Verify Installation
Once you managed to install agent, login to the VM in question and verify the installation of the tools are successful.
Below are the entries you are looking for..
For Linux RedHat VM,
rpm -qa | grep -i cortex-agent
For Linux Ubuntu VM,
dpkg -l | grep -i cortex-agent

Also, speak to MOJ Engineers (listed in the Pre-Requisites above) to confirm that the VM is reporting to XSIAM console correctly. May be if you are working on list of VMs, only send them a smaller amount of list at the end of the task.
Troubleshooting
1. Please note that while working on this, we found that there may be staled runcommand extension on the VM which we may not able to see from the Azure portal. You will get error message on the terraform that runcommand is conflicting with existing runcommand.
In order to fix this, you will have to run AZ cli command from your local to remove the staled extension.
Make sure you are on the correct subscription then run this, it will take few minutes to finish running this command.
az vm run-command invoke --command-id RemoveRunCommandLinuxExtension --name <VM-NAME> -g <VM-RESOURCE-GROUP>
2. If the tools are not installed for any reason, we have to troubleshoot to find out why.
Login to the Linux VM.
Change the user to the root user using below command
sudo -i
You can find the output of the script in this location here, hopefully this output would give you enough information to troubleshoot the issue.
/var/lib/waagent/run-command/download/<ID>
There is also some log available here but not very useful
/var/log/azure/run-command/
Uninstall
To uninstall the XDR agent from a Red Hat Linux machine we will perform the following
Verify agent is installed
bash
rpm -qa | grep -i cortex-agent
If installed, run the rpm erase command
bash
rpm -e cortex-agent
If this fails to work, you may need to specify the full version (this will have been output from the first command).
For example
bash
rpm —e cortex-agent-8.5.0.125392-1.x86_64
This will automatically remove the VM from the XSIAM Cortex portal
VMSS
If the XDR agent is being added to a VMSS, it is important to run an update instance command to complete the installation.
There are two versions of this command that can be used depending on the rollout approach.
For all VMSS instances:
bash
az vmss update-instances --resource-group <VMSS_RESOURCE_GROUP> --name <VMSS_RESOURCE_NAME> --instance-ids "*"
For one specific VMSS instance:
bash
az vmss update-instances --resource-group <VMSS_RESOURCE_GROUP> --name <VMSS_RESOURCE_NAME> --instance-ids "<INSTANCE_ID>"
XDR Collector
There is another package called the XDR Collector which is an optional install.
This package is used to gather logs that the agent cannot collect such as database logs.
We are not currently installing this on any machines as of 13/08/2024 but this may change in future.
A package has been uploaded to the same storage account and can be installed by the module if needed.
To check for a successful installation, you can run the commands below for each operating system.
For Linux RedHat VM,
rpm -qa | grep -i xdr-collector # run this only if you have installed collector
For Linux Ubuntu VM,
dpkg -l | grep -i xdr-collector # run this only if you have installed collector
For Windows VM,