Section 1 - Virtual Networks
Using Pipeline automation
If not already done so, navigate to your lab repository created in the Prereq section.
📣 Please follow the steps in that section if not already done so
Once you check in, following the Prereq steps, your pipeline will trigger and terraform will init and plan your code. You should now be able to review your plan from the Azure Devops pipeline.
❗️ Make it a habit to always review your terraform plan. Even if you think you know what’s in it already
Using Manual automation
You can execute the terraform command below from your local PC if you opted out of not following the setup steps. I strongly advice to take the automation route though as it introduces you to the Git repo and Azure DevOps pipelines and some other important concepts in Platform Operations.
📣 NOTE: You many run into permission issues using the manual process and would need to resolve it with your team members.
Step 1
Run the following commands to confirm you are in the right repository (if running from your local machine)
az login
az account show
az account set --subscription DTS-SHAREDSERVICES-SBOX
az account show
Step 2a
Run the following command terraform commands (if running from your local machine)
terraform init
terraform plan
terraform apply or terraform apply -auto-approve
Select yes to build resource as terraform will prompt you to approve you action if the -auto-approve is not provided
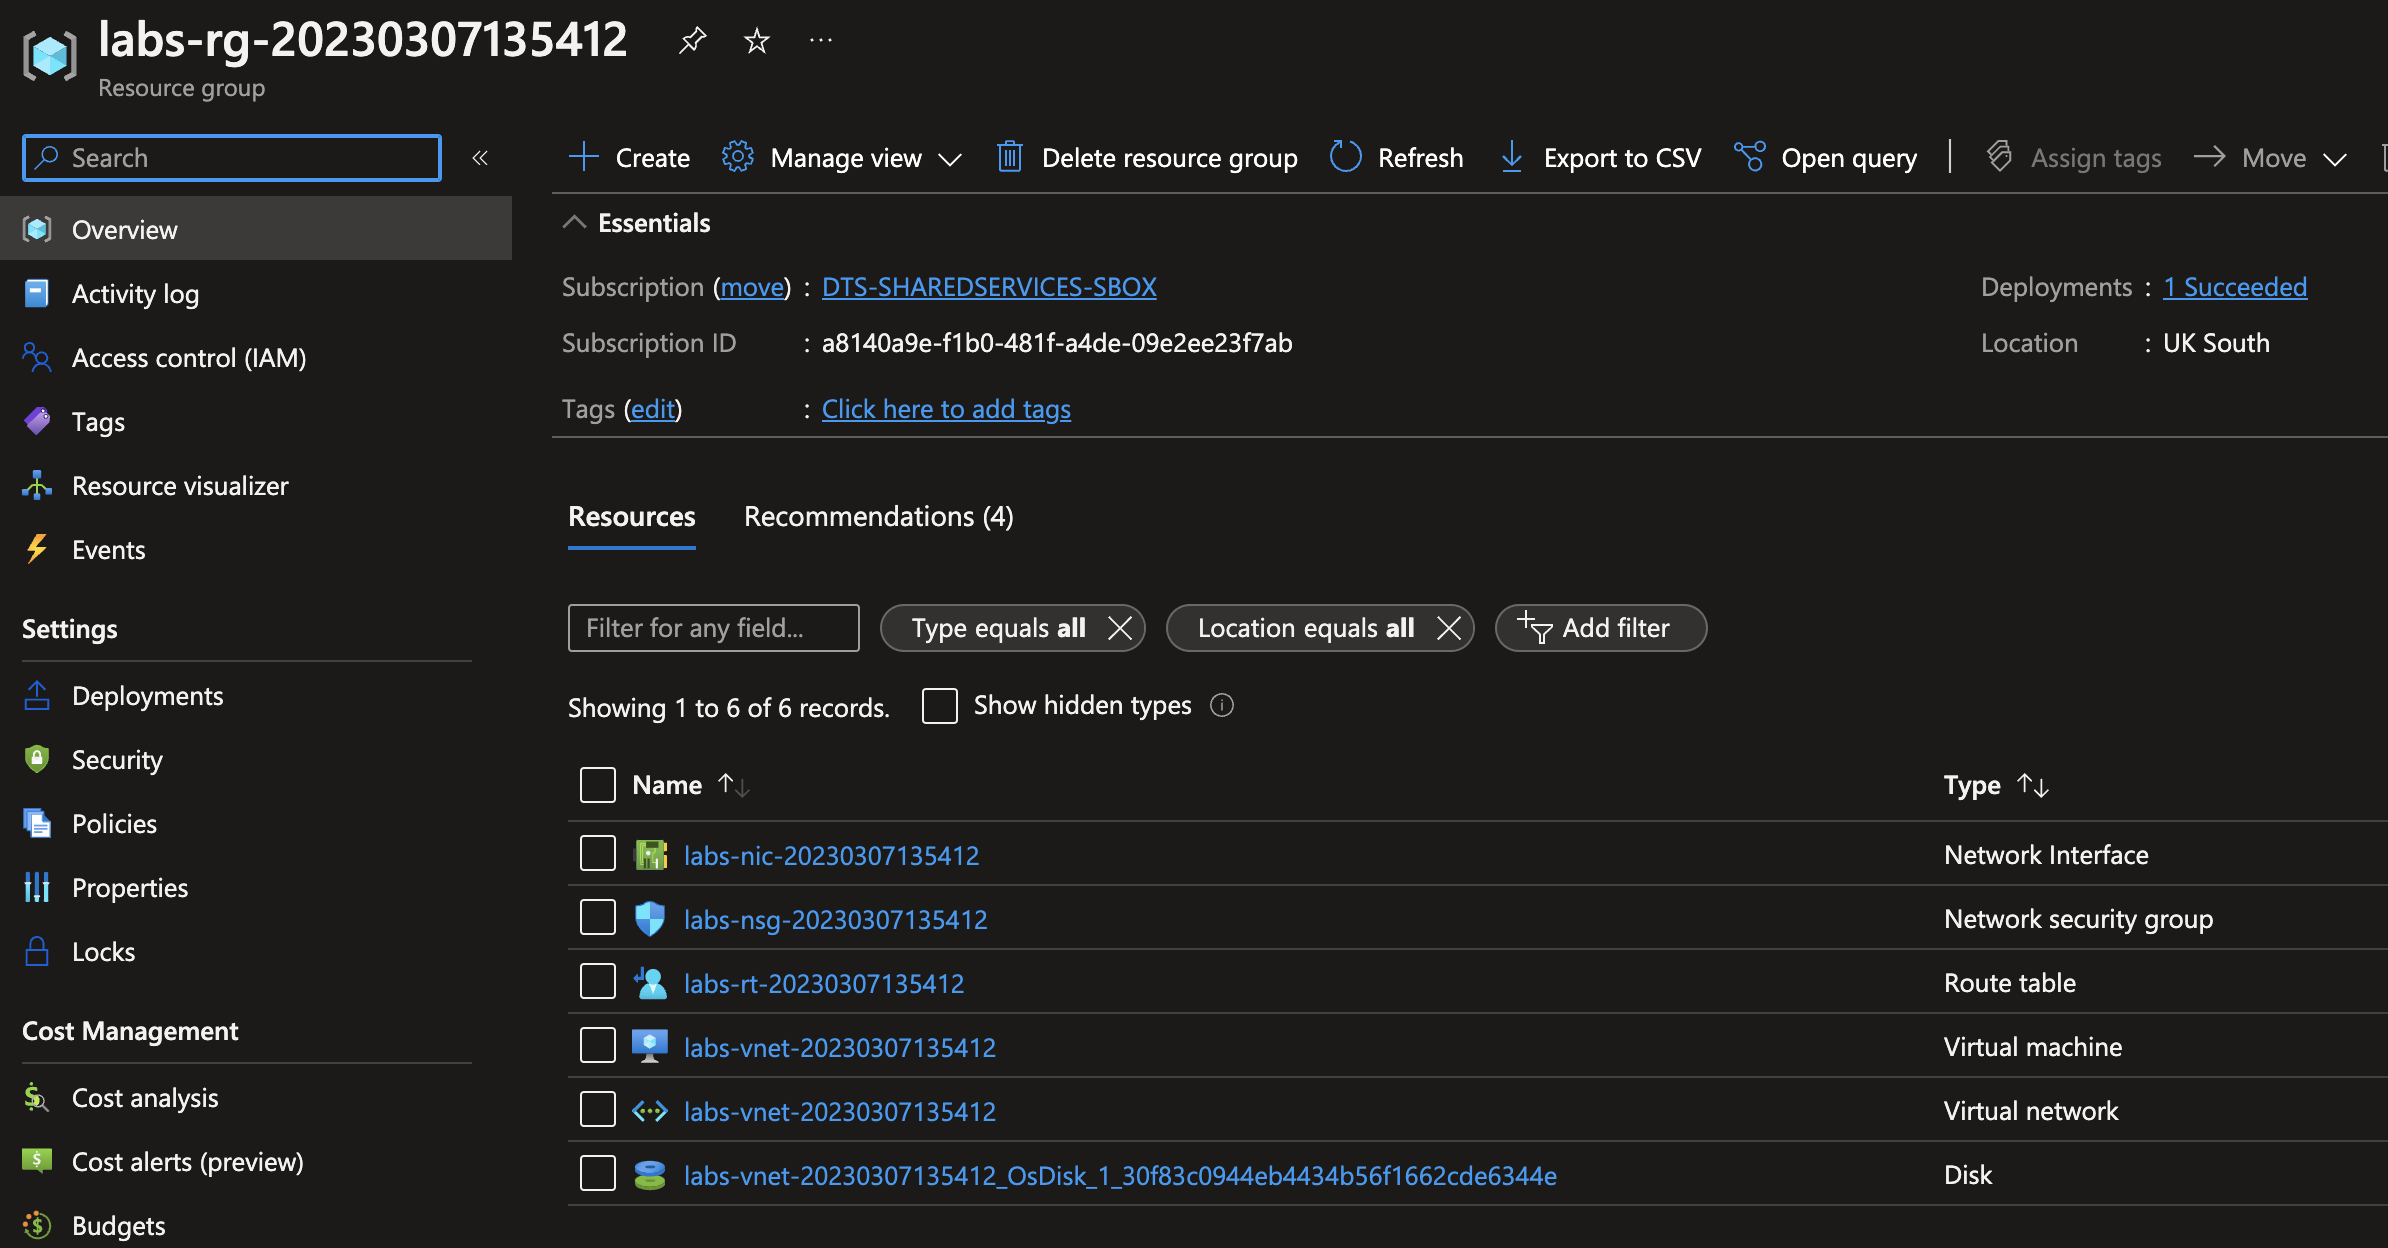
Log into the Azure portal and navigate to the DTS-SHAREDSERVICES-SBOX subscription, you should now have a similar resources created. Search for your resource group name
Terraform resources
Step 2b
If using the pipeline, a commit will init and plan your project. You can also optionally manually trigger a plan or apply from the devops UI.
In a production environment, its advised not to manually apply on master. apply should happen on merge of your PR.
Verify the following exist
- A virtual network (VNet) exist
- VNet has two peerings, one to the HMCTS Hub VNet and the other to the Core Management VNet
- A route table to one default route to
10.10.200.36
❗️WARNING
If your Terraform fails with peering errors it is likely that a previous lab exercise has not been cleared down correctly.
Log into Azure and search for the the `core-infra-vnet-mgmt` virtual network then look at the existing Peering for the vnet.
Search the peers for `labs` and any existing lab peering should appear, if any show as disconnected then these should be removed.

Step 2c
Now that the pipeline has run and created your resources, we need to check that the web application running on your virtual machine is listening on port 80. To do this we must log into the machine using a bastion.
- Navigate to https://myaccess.microsoft.com/, click the organisations button, then My Access > Access Packages. Self grant access to ‘Non-Production Bastion Server Access’.
- Once granted (see the “Active” tab), log into Azure terminal using the command
az loginand connect to theDTS-MANAGEMENT-SBOX-INTSVCsubscription. - When logged into Azure CLI run
az ssh vm -n bastion-sbox -g bastion-sbox-rgto connect to the bastion host. Select yes to the certificate fingerprint prompt. - Now you are logged onto the bastion host. Connect to your virtual machine using
ssh <your_username>@<your_vm_private_ip>, for examplessh labsAdmin2023@10.10.4.4. Select yes to the certificate fingerprint prompt. - You are now logged into your freshly created virtual machine. This VM SKU should come with apache installed. Lets run
sudo ss -ltnto check if the VM is listening on any ports.
VM is now listening

- As shown in the above screenshot, port 80 is in the list of listening ports on the virtual machine.
✅ Success Criteria - Step 2
You’ll know Step 2 worked when:
- Terraform apply completed successfully without errors
- Resource group exists in Azure Portal under DTS-SHAREDSERVICES-SBOX subscription
- Search for:
labs-rg-<yourname>-<timestamp>
- Search for:
- Virtual Network created with your specified CIDR (e.g.,
10.10.7.0/25) - Two VNet peerings exist and show status “Connected”:
- Peering to hmcts-hub-sbox-int
- Peering to core-infra-vnet-mgmt
- Route table exists with default route to
10.10.200.36 - Virtual machine created and shows “Running” status in Azure Portal
- VM is listening on TCP port 80
- VM has no public IP (security best practice)
- Required tags present on all resources (check any resource’s Tags section)
What did I just create?
- A virtual network that’s peered to 2 other VNets using the vnet peering module VNet peering is essential for communication between the various virtual networks. Most importantly, for network traffic to flow from the Hub vnet where the Palo Alto firewall lives to your vnet they need to be peered
- Tagged resources using the tagging module. Tagging is an important part of the way we manage resources and is essential for managing running infrastructure and cost. This is enforced via Azure Policy and is defined in the azure-policy repo
- A custom route table that routes all traffic to the hub. We operate a hub and spoke model. All network traffic should pass through the hub for inspection before being forwarded to it’s destination. In our hub we have 2 active Palo Alto firewall NVA that inspects traffic and forwards it if allowed to the next hop which is usually another virtual network.
- A virtual machine without a public IP. We normally dont allow direct access from the internet to the backend resources. This has to ingress via a route which passes the hub and firewalls. This pattern is followed for most if not all resources or applications.
- A virtual machine that can be accessed via the bastions, as it does not have a public IP, because its been peered with the core-infra-vnet-mgmt vnet, it can be accessed via the HMCTS bastions.
Select the virtual network and copy the vnet address cidr e.g.10.10.7.0/25yours would be different if you used a different CIDR
📣 NOTE: You will need to be connected to the VPN to access the bastions, this will be explained in more detail later on in this tutorial.
Assignment 📕 If you want a bit of a stretch, notice that the vm’s credentials are hard coded and checked into the git repo? That’s a big no no in the real world.
You could try adding a key vault resource that holds the vm’s username and password and also use the random password provider to generate your vm’s password. Take note of dependencies, make sure your key vault and values are created first.
Happy Hunting!!!
Step 3
About Panorama Management
Panorama is Palo Alto’s centralized firewall management platform. In Platform Operations, we use it to:
- Manage firewall policies: Control what traffic is allowed between networks
- Configure address objects: Define IP ranges for applications and services
- Monitor network traffic: View logs and troubleshoot connectivity issues
- Audit security rules: Track changes to firewall configurations
📣 NOTE: Engineers can also access Panorama via the AppProxy URL: https://panorama-sandbox.hmcts.net
On most tickets you’ll work on, you’ll use Panorama to:
- Add address objects for new applications or VNets
- Create security policies to allow traffic to your services
- Debug network connectivity issues by checking traffic logs
- Verify that firewall rules are correctly applied after merging PRs
Now let’s configure Panorama for your lab environment.
Checkout the hub-panorama-terraform repo and create a new branch.
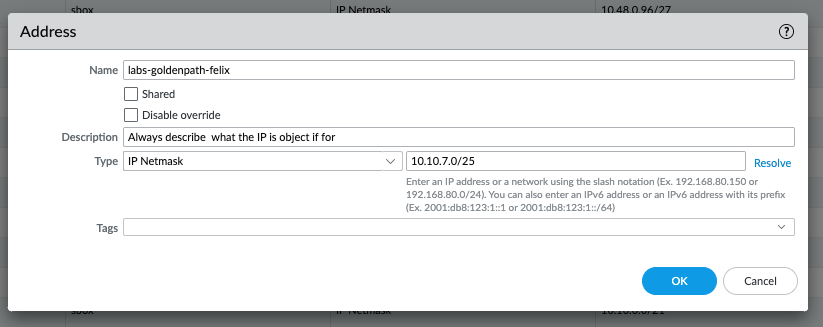
Navigate to 02-addresses-sbox.tf file and add a new address object called labs-goldenpath-<yourname> (example below)
 {
   environments = ["sbox"]
   device_group = "sbox"
   name         = "labs-goldenpath-<yourname>"
   value        = "10.10.7.0/25"
 }
The value should be the cidr address space of your vnet
Next navigate to the 04-policy-rules-sbox.tf file and create a new security policy with the following details
  {
    environments          = ["sbox"]
    device_group          = "sbox"
    name                  = "labs-goldenpath-<yourname>"
    source_zones          = [var.zone_untrusted]
    destination_zones     = [var.zone_trusted]
    source_addresses      = ["any"]
    destination_addresses = ["labs-goldenpath-<yourname>"]
    applications          = ["web-browsing"]
    services              = ["application-default"]
    action                = "allow"
    disabled              = false
  }
The ordering of security rules doesn’t matter, however we recommend you add this just after the trusted-default policy. This is telling the firewall
to allow traffic coming from the “untrusted” zone, internet traffic to your lab VNet in the “trusted” zone
Step 4
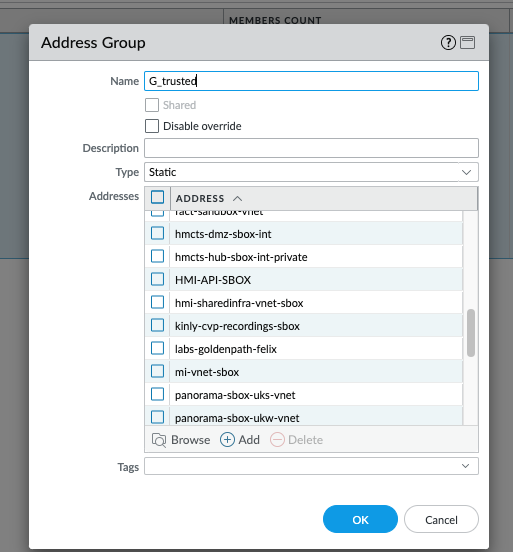
Adding your new address object to the G_trusted group will allow your VNet to communicate with other VNets i.e. East/West network flows. For example, when you’re logged in via the VPN you can ssh via the bastions to your virtual machine as both the bastion vnet and your new lab vnet are part of the G_trusted group communication is allowed via the trusted-allow security policy on the Palo Alto firewall.
To do this, navigate to the Address Group folder to 02-address-groups-sbox.tf, add your new address object to the existing G_trusted group’s static_addresses list e.g. add labs-goldenpath-<yourname>.
Example below
 {
   environments = ["sbox"]
   device_group = "sbox"
   name         = "G_trusted"
   static_addresses = [
   ...,
   "labs-goldenpath-<yourname>"
   ]
}
🛠️ Commit your changes, add the relevant details to your PR, review any terraform plan, get approvals then merge
✅ Success Criteria - Steps 3-4
You’ll know Panorama configuration worked when:
- PR merged successfully in hub-panorama-terraform repo
- Terraform pipeline completed without errors
- In Panorama UI (requires VPN):
- Navigate to Objects > Addresses
- Your address object
labs-goldenpath-<yourname>exists with correct CIDR - Navigate to Objects > Address Groups
G_trustedgroup contains your address object- Navigate to Policies > Security
- Your security policy
labs-goldenpath-<yourname>exists - Policy shows: Source Zone = untrusted, Dest Zone = trusted, Action = allow
Verification in Panorama:
- Connect to F5 VPN
- Open the Panorama Management UI: https://panorama-sbox-uks-0.sandbox.platform.hmcts.net or https://panorama-sandbox.hmcts.net
- Select device group: “sbox” (dropdown at top)
- Check Objects > Addresses > search for your name
- Check Policies > Security > filter by your policy name
Step 5
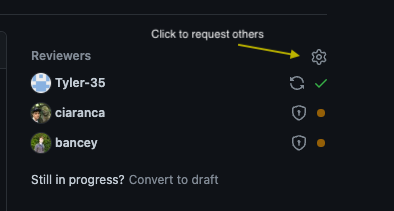
Get a team member to review your PR, merge after you have reviewed the terraform plan and approvals have been received. You can either request a specific team member to review or request everyone in a Squad or every in platform operations. By default, 3 members would be selected randomly for you in most repos, you can set up Git notify to keep you informed.
Git reviewers
Step 6
Log into the sbox Panorama Management UI and verify your changes are in place. Please note, you need to be have appropriate AD groups and F5 VPN running to access this resource.
- To find out which groups are needed for the VPN read the Microsoft Entra ID section of the onboarding
- To find out how to get the F5 VPN working read the following guide
- If you are having issues logging into Panorama UI have a look at this Panorama Walkthrough session.
- Ensure your Global Connect VPN is disconnected, as your be unable to connect or resolve certain services
🛠️ Commit your changes, add the relevant details to your PR, review any terraform plan, get approvals then merge
What did i just create?
From the above entries you have created a security policy that allows network request flow through the firewall to your virtual machine in your vnet. Without this rule your applications or services would be unreachable as they are not accessible from the internet by default
You should now have resources similar to the following:
Address Object Entry
Address Group Entry
Security Policy Entry

Step 7
Create an Azure Firewall DNAT rule and checkout the hub-terraform-infra repo
To add a new DNAT rule, navigate to the hub_infra-sbox-int.tfvars and add the following snippet. The name of this should be same name of your lab and IP of your apache server (in the virtual machine created in step 2).
Use the next available index in your case. Once this resource is created, you can find it in sbox-int-uksouth-fw
{
   name : "labsgoldenpath<yourname>",
   palo_ips : {
   "uksouth" : "10.10.7.4"
   },
   port : [80,]
   index : 6
}
🛠️ Commit your changes, add the relevant details to your PR, review any terraform plan, get approvals then merge
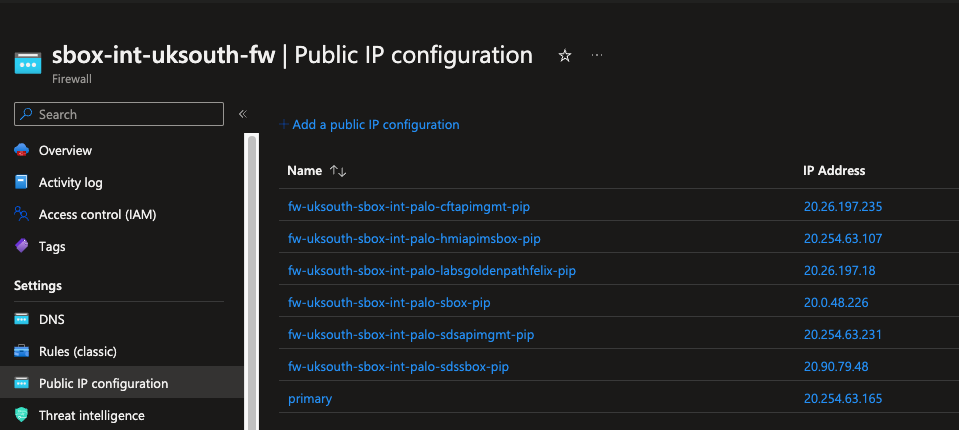
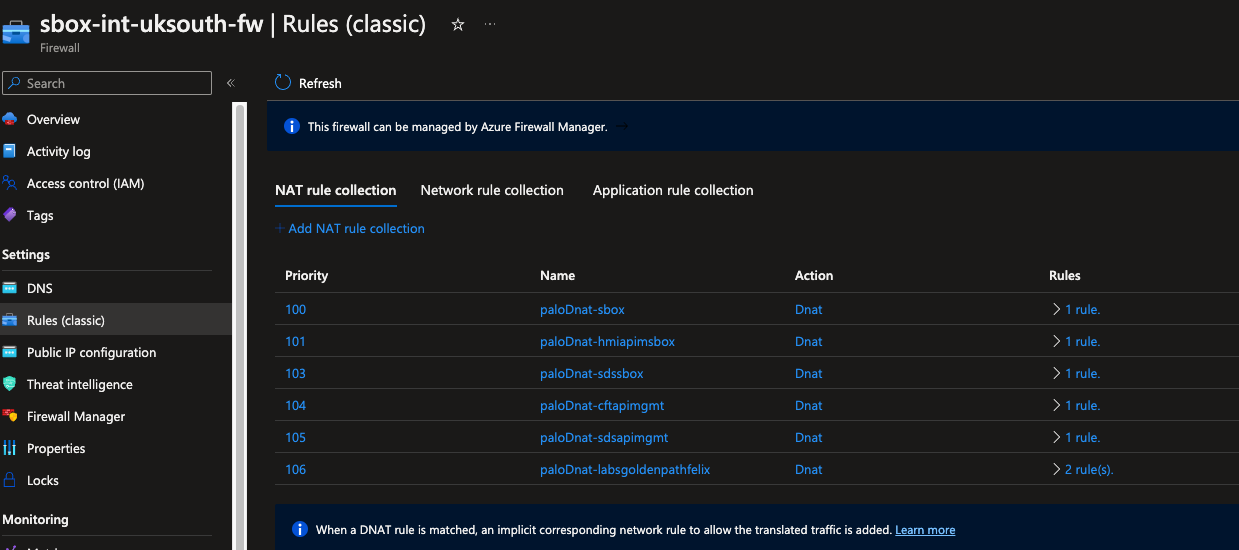
Go to the Azure portal and review your changes in the sbox-int-uksouth-fw,
this will create a new public IP address. You can verify your new IP by looking at the IP configuration (in the IP Configuration menu). On the right of
the firewall menu, you should see something similar to fw-uksouth-sbox-int-palo-labsgoldenpathfelix-pip.
Resources would be similar to the following:
IP Configuration
Azure Firewall rules
✅ Success Criteria - Step 7
You’ll know Azure Firewall DNAT rule worked when:
- PR merged in hub-terraform-infra repo
- Terraform pipeline completed successfully
- Public IP created in Azure Firewall
- Portal: sbox-int-uksouth-fw
- Navigate to: IP Configuration
- Look for:
fw-uksouth-sbox-int-palo-labsgoldenpath<yourname>-pip
- DNAT rule exists
- Portal: sbox-int-uksouth-fw > Rules (classic) > NAT rule collection
- Your rule maps public IP port 80 → your VM private IP port 80
- Default DNS record created automatically for the public IP
- Format:
firewall-sbox-int-palo-labsgoldenpath<yourname>.uksouth.cloudapp.azure.com
- Format:
- Can access VM via default DNS:
# Test access to your VM through Azure Firewall
curl -I http://firewall-sbox-int-palo-labsgoldenpath<yourname>.uksouth.cloudapp.azure.com

# Should return HTTP 200 and Apache default page
📣 Keep a note of the public IP address - you’ll need it for Front Door configuration.
At this point you should be able to access your apache server from your browser by using the default
DNS record created, which is associated with the Azure Firewall.
The DNS record should be similar to http://firewall-sbox-int-palo-labsgoldenpathfelix.uksouth.cloudapp.azure.com/ depending on your lab name.
You can find exact value of this default DNS record by searching for the Public IP resource with the same name as your entry in the Public IP configuration on sbox-int-uksouth-fw.
Step 8
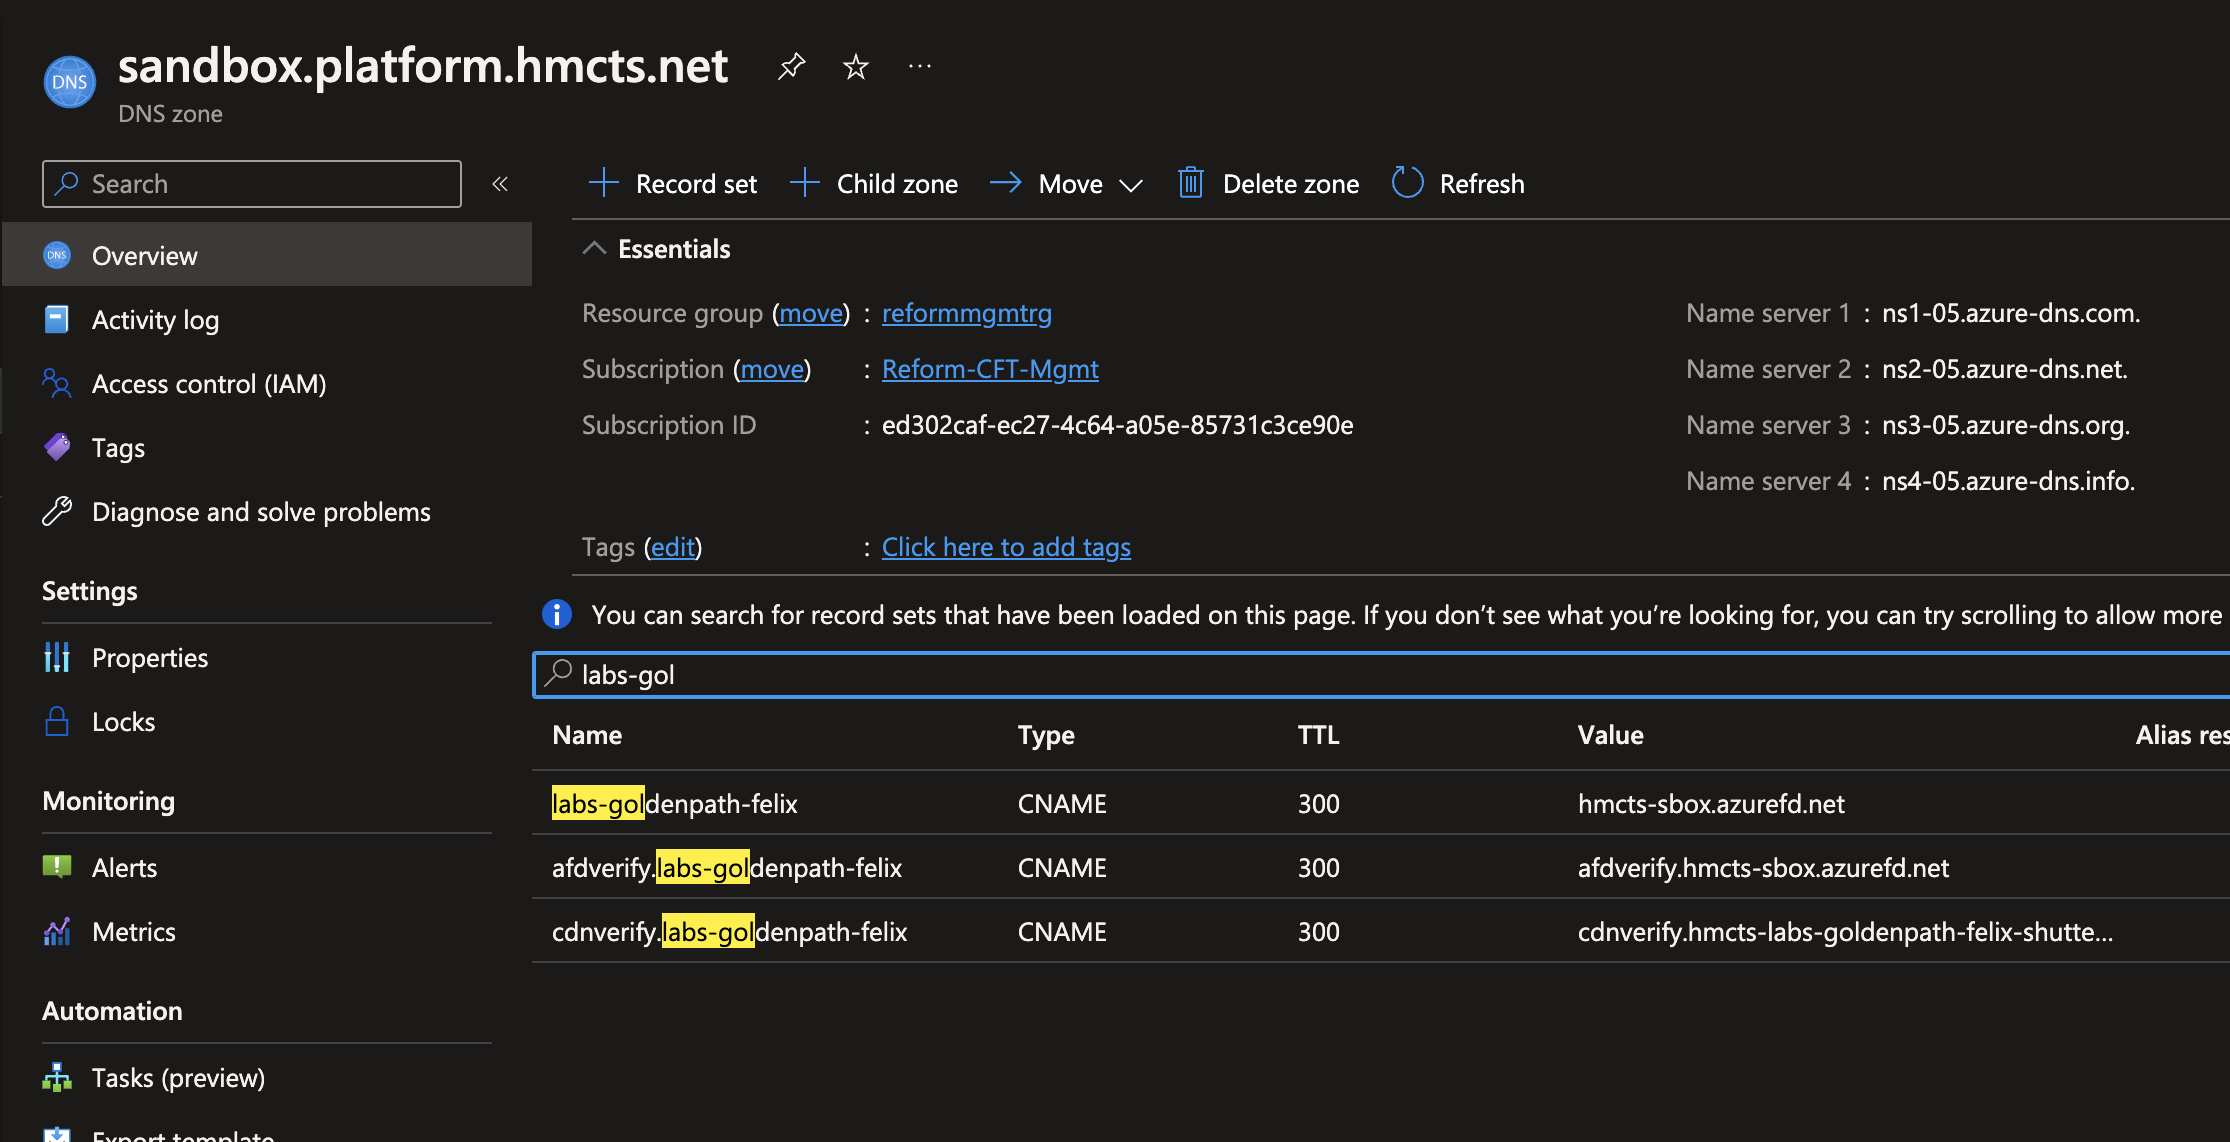
Create a Public DNS record.
Checkout the azure-public-dns
Navigate to sandbox.yml file add a new CNAME record using Azure Frontdoor url hmcts-sbox.azurefd.net
  cname:
  ...
  - name: "labs-goldenpath-mfox"
    ttl: 300
    record: "hmcts-sbox-gufqadefbjgbhkhv.z01.azurefd.net"
    shutter: false
The above record corresponds to an endpoint on the hmcts-sbox Front Door and CDN resource.
🛠️ Commit your changes, add the relevant details to your PR, review any terraform plan, get approvals then merge
You should now see the similar entries as below
Public DNS entries
Step 9
Create a corresponding Frontdoor entries.
Checkout the azure-platform-terraform repo
Navigate to the sbox.tfvar file and add the below entry to the frontends property list
  {
    product          = "labs-goldenpath-<yourname>"
    name             = "labs-goldenpath-<yourname>"
    custom_domain    = "labs-goldenpath-<yourname>.sandbox.platform.hmcts.net"
    dns_zone_name    = "sandbox.platform.hmcts.net"
    backend_domain   = ["firewall-sbox-int-palo-labsgoldenpath<yourname>.uksouth.cloudapp.azure.com"]
    certificate_name = "wildcard-sandbox-platform-hmcts-net"
    disabled_rules   = {}
  }
🛠️ Commit your changes, add the relevant details to your PR, review any terraform plan, get approvals then merge.
📣 Note: There is an ongoing issue where the pipeline for the above code might try to create two identically named DNS TXT records at the same time. In such case you might see following Terraform failure:
Error: A resource with the ID <XYZ> already exists - to be managed via Terraform this resource needs to be imported into the State. Please see the resource documentation for "azurerm_dns_txt_record" for more information.
Until this is fixed, the work around is to manually delete the TXT record from the DNS Zone in Azure portal and re-run the Terraform.
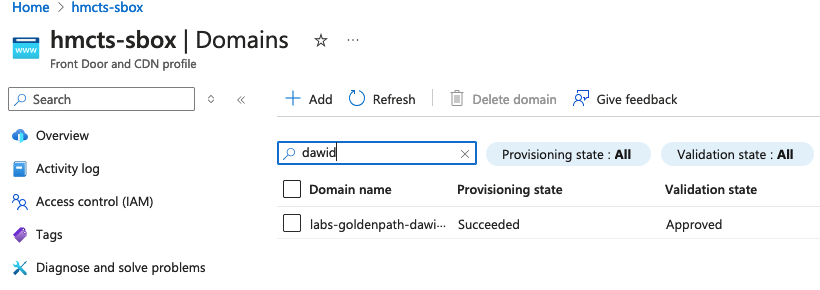
Once everything is complete you should be able to see “Validation State” as “Approved” for your Custom Domain in hmcts-sbox.
This may take a while so you can go grab a cup of coffee or tea.
Custom Domain validated
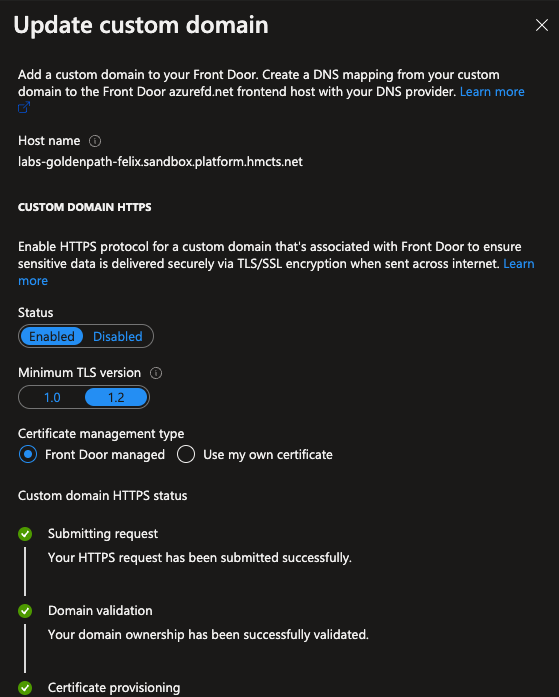
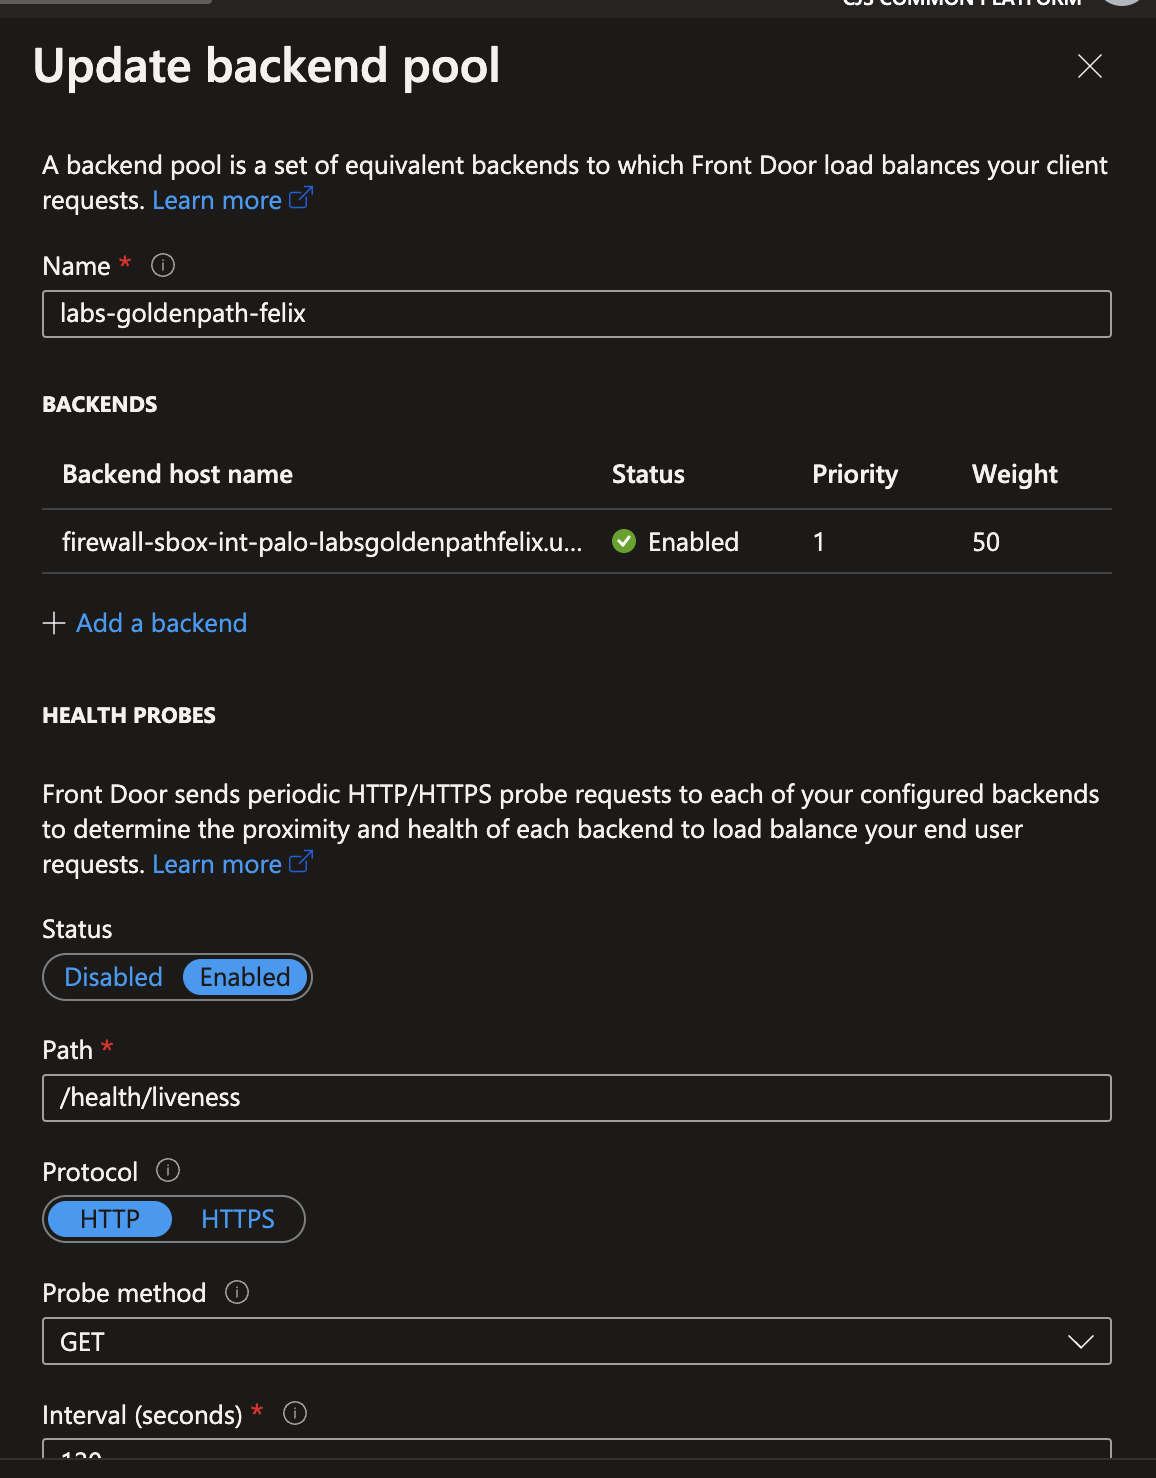
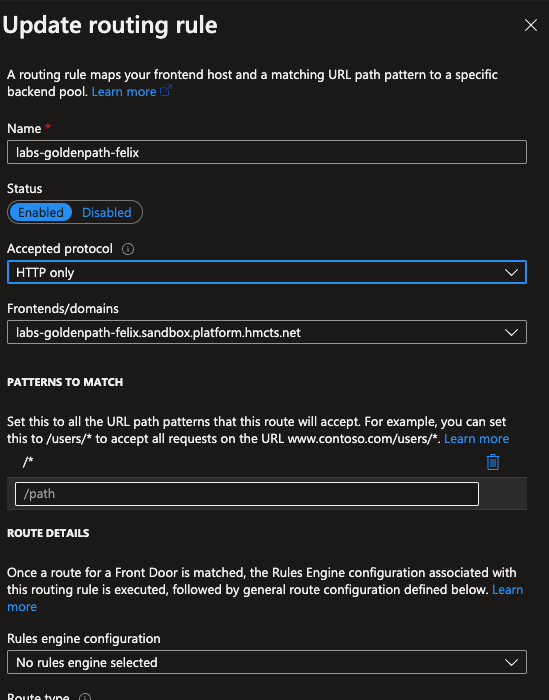
What did i just create?
A custom domain that matches to your DNS entry created above, a backend pool that frontdoor sends request to which matches the public ip created above and attached to the Azure firewall and a routing rule that Azure frontdoor needs to process your requests.
Custom Domain
Backend pool
Routing rule
Step 10
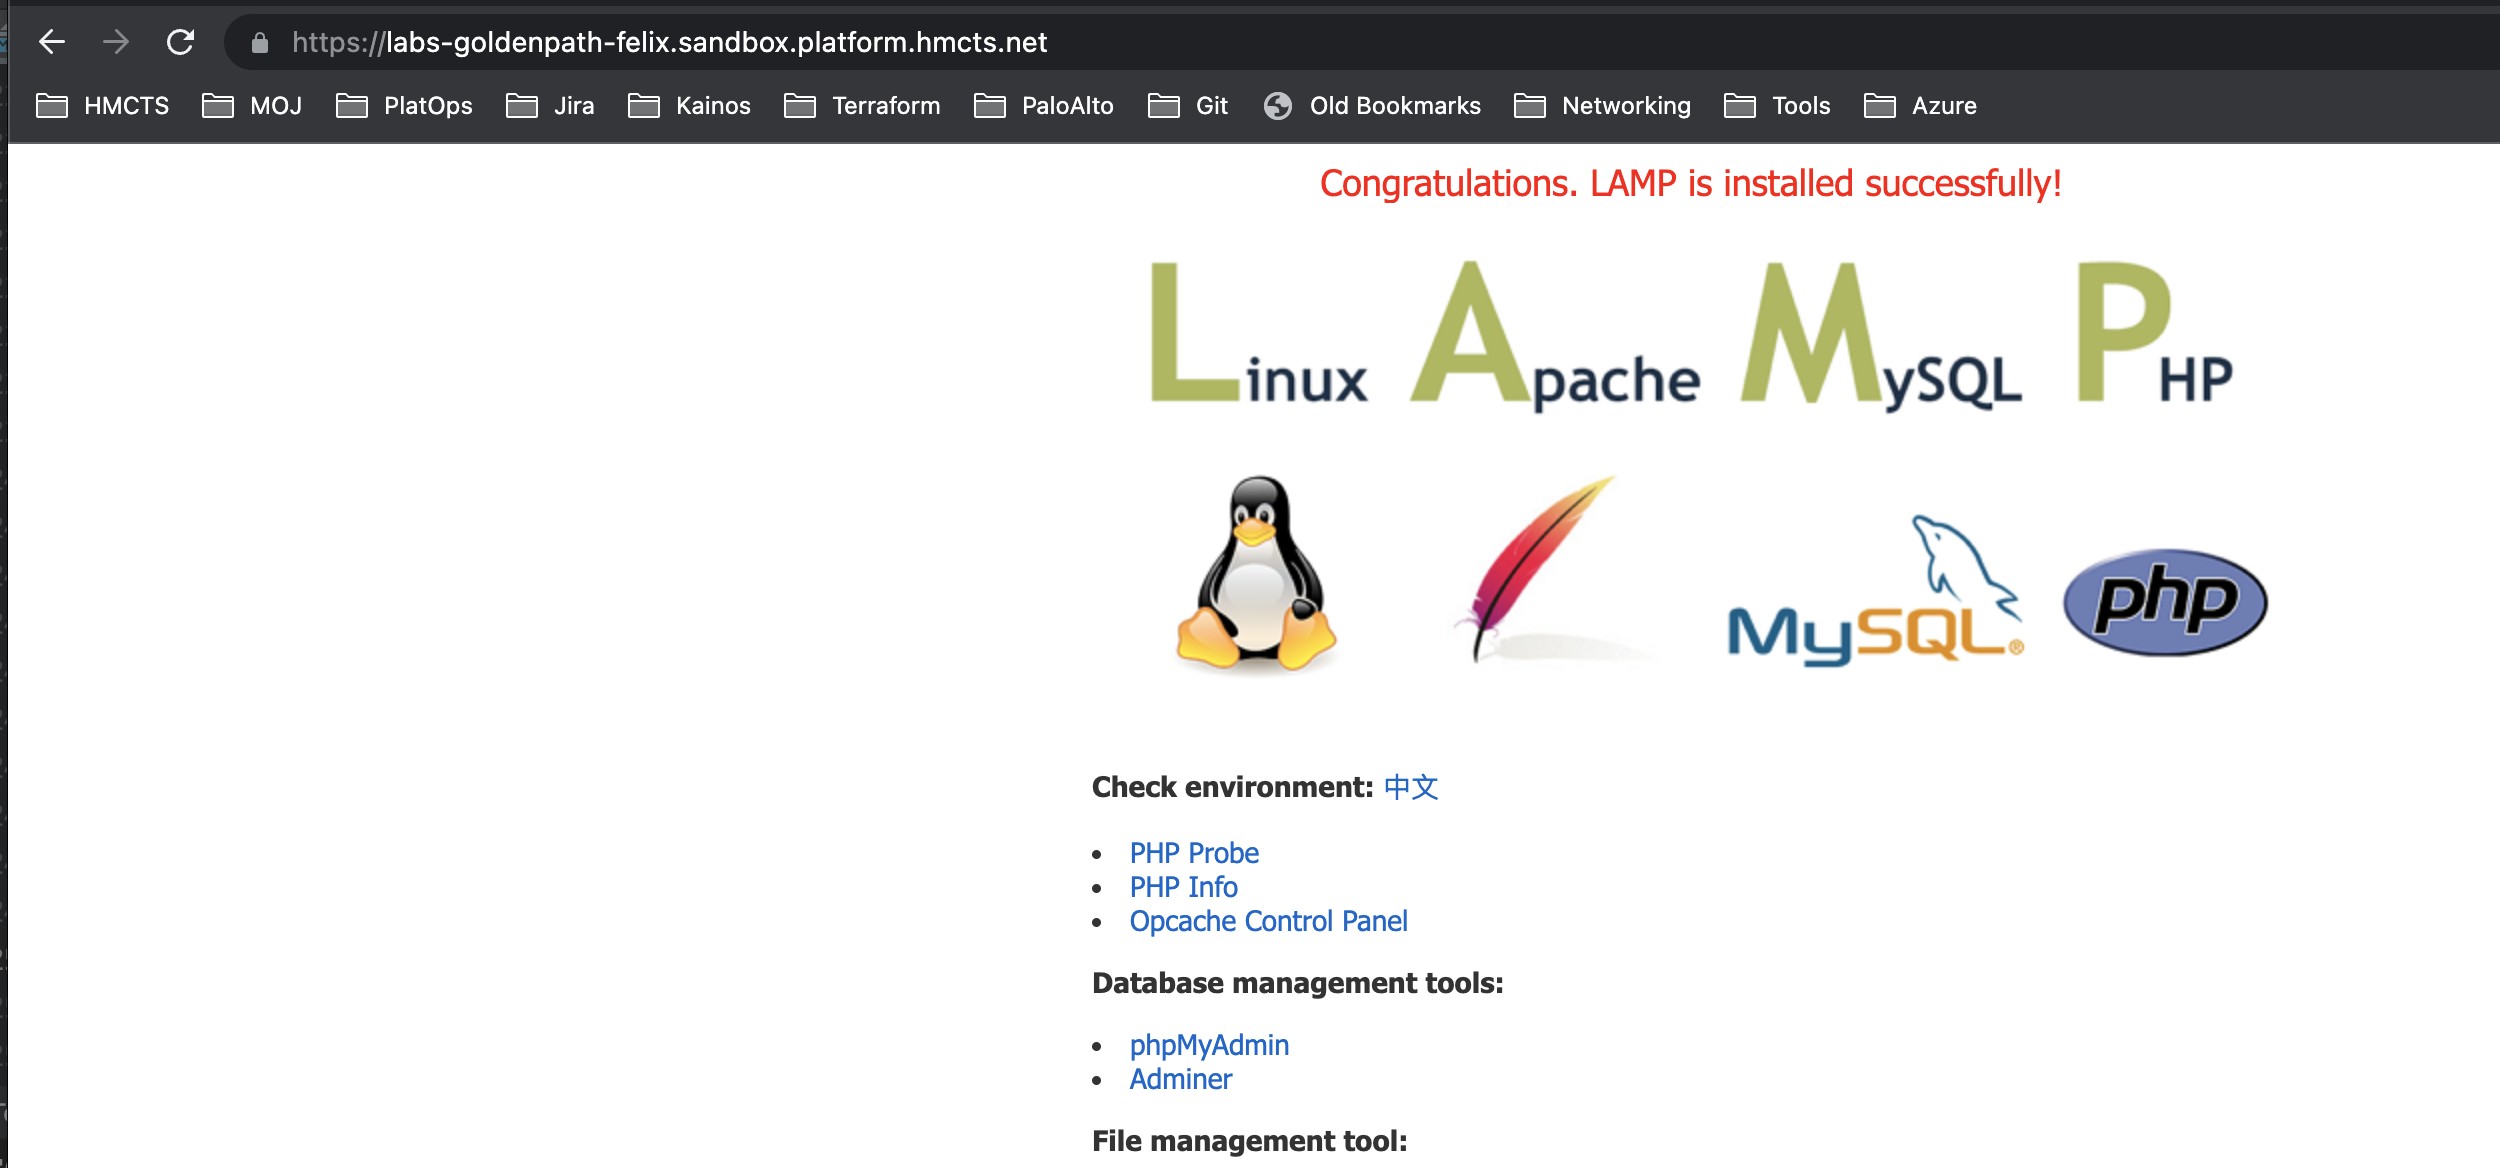
Verify that you can
- Navigate to your url e.g.
https://labs-goldenpath-<yourname>.sandbox.platform.hmcts.netand see your web server default page
Final result
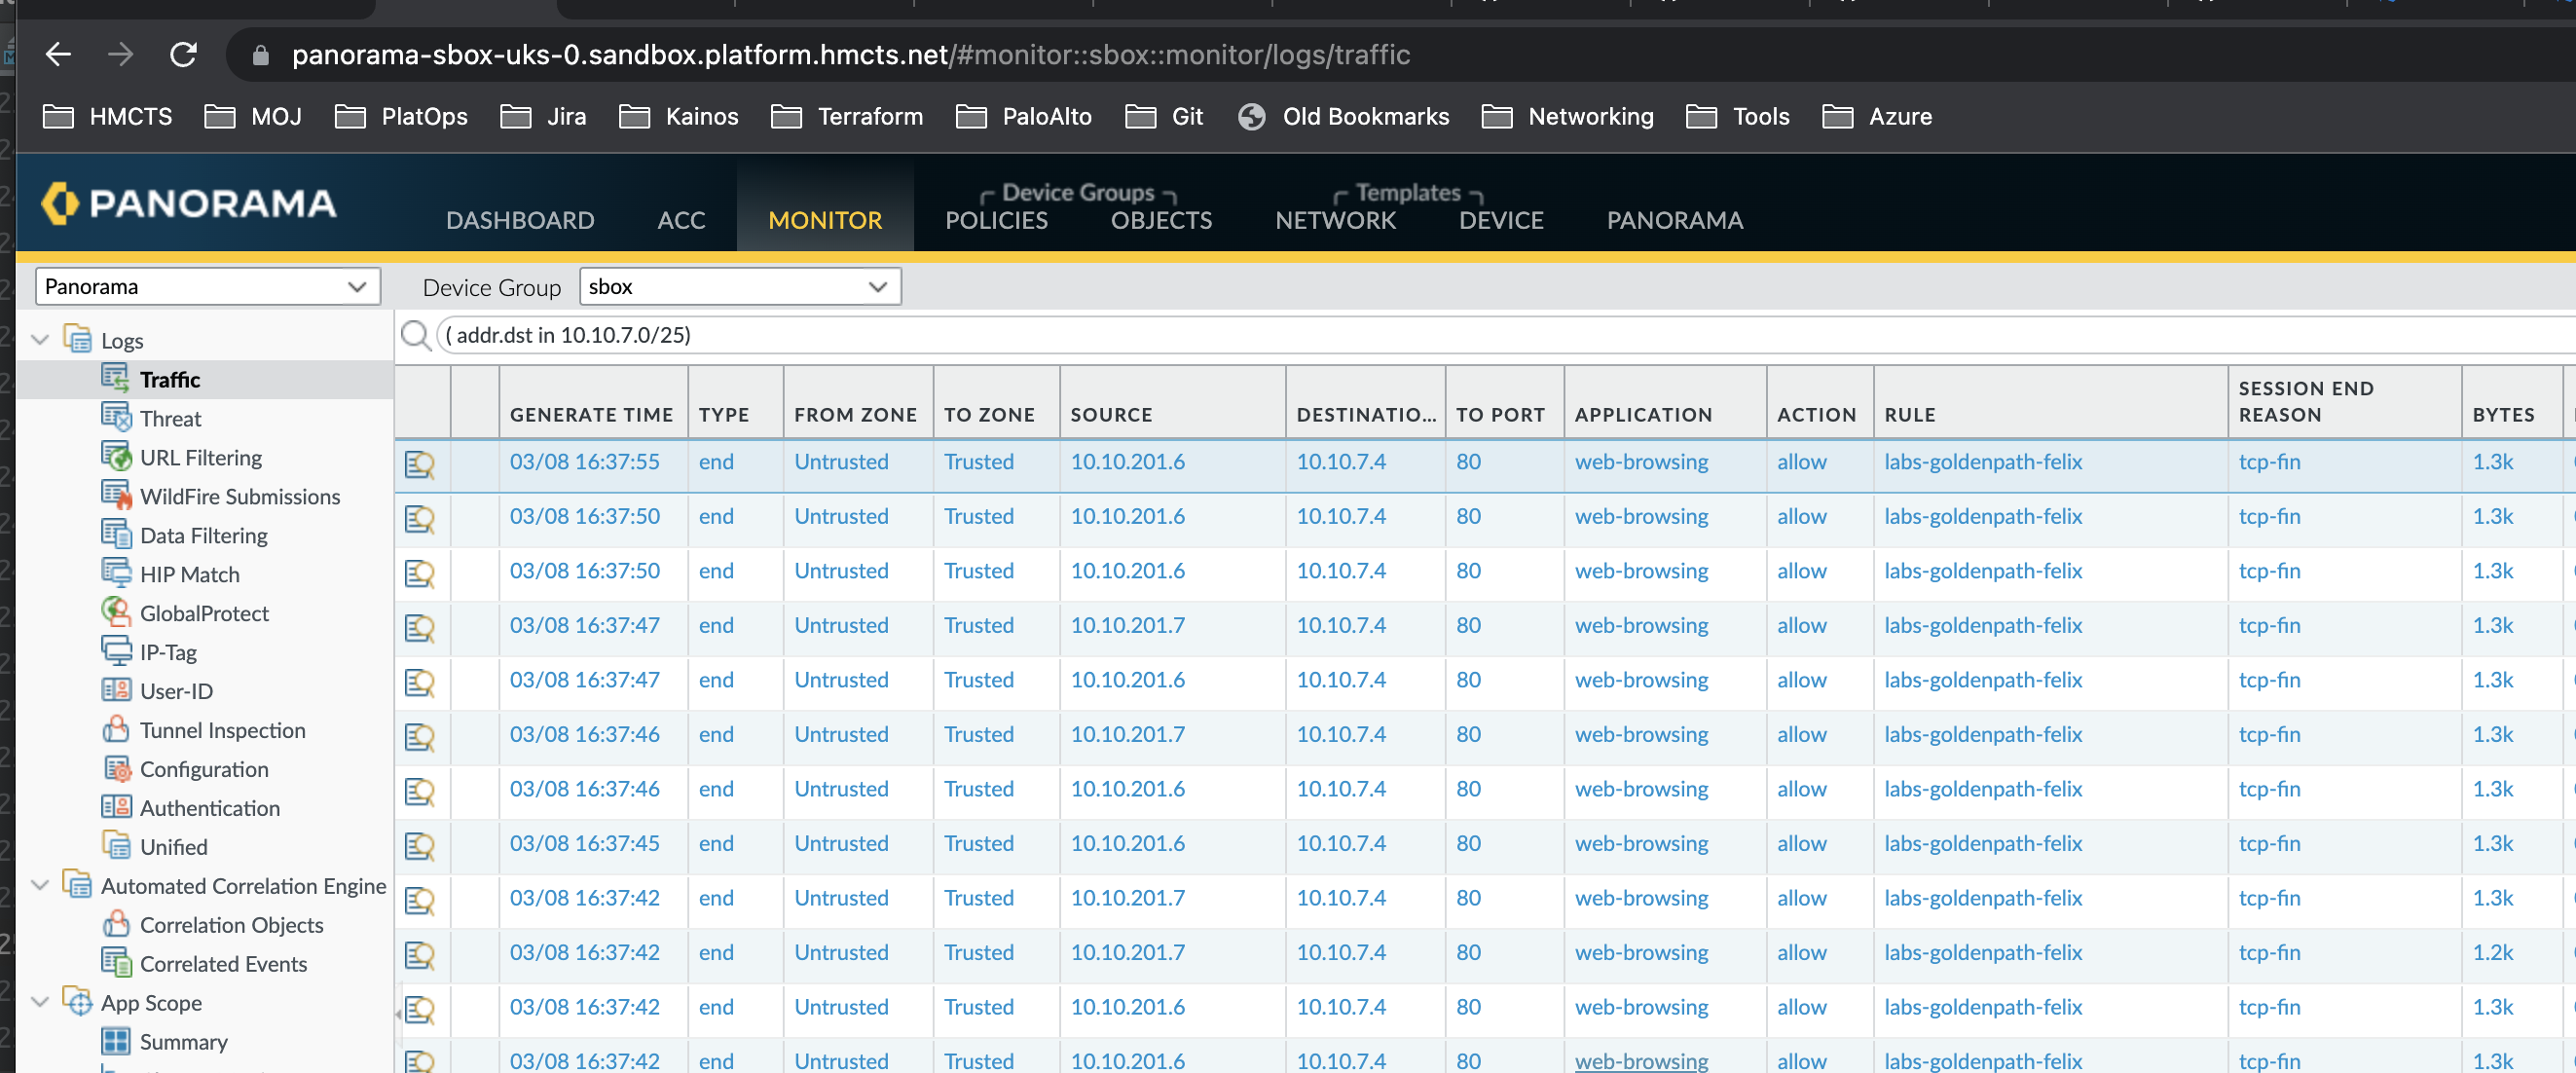
- Navigate to the Panorama management UI and see your traffic logs.
To filter the logs you can type in the below query in the search bar
( addr.dst in <your-vm-private-ip> )
Where <your-vm-private-ip> is the same as the IP on your virtual machine
Final result - logs
To learn more about Palo Alto firewall logs watch the Navigating Palo Alto firewall logs KT session
📣 NOTE: You will need to have F5 VPN connection and non-production Access Package granted before you can SSH into the sandbox bastion. Follow this guide to obtain this.
✅ Success Criteria - Complete Virtual Networks Section
You’ve successfully completed the Virtual Networks section when ALL of these work:
1. Public URL Access
curl -I https://labs-goldenpath-<yourname>.sandbox.platform.hmcts.net
Should return HTTP/2 200 and your web server (Apache)
2. DNS Resolution
nslookup labs-goldenpath-<yourname>.sandbox.platform.hmcts.net
Should return Front Door IP
3. Front Door Configuration
- Navigate to hmcts-sbox Front Door
- Your custom domain shows “Validation State: Approved”
- Backend pool shows “Healthy” status
- Can access via Front Door direct URL
4. Panorama Traffic Logs
- Connected to F5 VPN
- Logged into Panorama
- Monitor > Logs shows traffic to your VM IP
- Traffic shows “Action: allow” (not deny)
5. SSH Access to VM
Connected to VPN, SSH to bastion:
bash
az ssh vm -n bastion-sbox -g bastion-sbox-rg --subscription DTS-MANAGEMENT-SBOX-INTSVC
From bastion, curl your VM:
bash
curl <your-vm-private-ip>
Returns Apache HTML
SSH to your VM:
bash
ssh labsAdmin2023@<your-vm-private-ip>
Successfully logs in
6. Browser Access
- Open browser (not on VPN if testing public access)
- Navigate to:
https://labs-goldenpath-<yourname>.sandbox.platform.hmcts.net - See Apache default page or your custom content
- SSL certificate valid (no browser warnings)
- Page loads within a few seconds (Front Door caching works)
Congratulations!
You’ve successfully:
- Created VNet infrastructure with proper peering and routing
- Configured firewall rules for network security
- Set up DNS and Front Door for public access
- Gained hands-on experience with the full HMCTS network stack
You’re now ready to move on to the AKS Cluster section!